 1-3/8/99
Called Dax to ask if it's possible to fit the rear wings with an
equal gap all round. Gary says 'No' and also that the passenger side wing is harder to fit
than the driver's (which is exactly what I'd found). Dax will also send me a new
temperature gauge and sender in an attempt to get a working pair. To keep them happy (and
because I was going to anyway), I ordered two tonneau covers - the main one and a boot
cover. Black with green edging again, to continue the theme.
Filed the edge of the boot box moulding and the lip of the rear
tub moulding to get the boot box to drop into place a bit more easily. It's nearly there
but will need more relieving.
With John's help, fitted both rear wings using bolts and large
spreader washers where bolting GRP to GRP and self-tapping bolts where the wing crosses a
chassis rail. They're still quite tight at the front (hope Mr. SVA Man doesn't think
they'll rub the tyres) but are now very solid. You could probably sit on them safely, not
that I intend to try it!
4-11/8/99
A week off work! Yahoo!
 Fitted the rear lights to the wheel arches. Now that things have settled a
bit, the driver's side arch does actually rub the tyre :-(
Fitted the rear lights to the wheel arches. Now that things have settled a
bit, the driver's side arch does actually rub the tyre :-(
Got the temperature gauge and another sender (#5) from Dax. This
sender has a lower resistance in boiling water and was duly fitted. We now have a reading
on the gauge! Hurrah! The engine stabilises at an indicated 85 - 90 degC, with the
radiator fan cutting in from time to time.
To cure the rear wing rub, I packed out the flange on the
underside of the arches. This was tending to pull the wing edge inwards when tightened
against the body side. I also took Mr. Grinder to the return lip inside the arches and
ground away the GRP where it was closest to the tyre. The result is now about 2cm
clearance on both wheels. Hope it's enough.
 Torqued the remaining rear suspension bolts. Fitted the remaining bonnet
clip covers. Stuck edge trim to the boot box moulding. This moulding is attached to the
rear tub with pretty-head bolts and spire nuts. Dax gave me ten, but four seems totally
adequate. With the remaining bolts, I attached some mudflaps to the front wings.
Torqued the remaining rear suspension bolts. Fitted the remaining bonnet
clip covers. Stuck edge trim to the boot box moulding. This moulding is attached to the
rear tub with pretty-head bolts and spire nuts. Dax gave me ten, but four seems totally
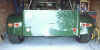
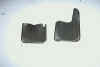
adequate. With the remaining bolts, I attached some mudflaps to the front wings. 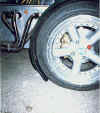 A brief run had shown that copious quantities of road grit was being spat
out from the front tyres and was bouncing merrily off the rear arches. The mudflaps, made
from a butchered pair of Halfords' cheapest one-size-fits-all mudflaps, were bolted to the
bottom of the front wings using these bolts and spire nuts. The result, if I say so
myself, looks quite good :-) They hang down to within an inch of the ground and should
catch most of the grit.
A brief run had shown that copious quantities of road grit was being spat
out from the front tyres and was bouncing merrily off the rear arches. The mudflaps, made
from a butchered pair of Halfords' cheapest one-size-fits-all mudflaps, were bolted to the
bottom of the front wings using these bolts and spire nuts. The result, if I say so
myself, looks quite good :-) They hang down to within an inch of the ground and should
catch most of the grit.
Glued the boot carpet in place and installed the harness eyebolts
through the boot box and into their bushes on the chassis. The harnesses went in together
with their natty little SVA gaiters. Friend John stuck some edge-trim to the air-filter,
to soften its corners.
I did a basic tune to the engine, setting the advance to 6
degrees BTDC (without vacuum). The borrowed CO meter shows all OK. I put my trusty Gunsons
Colourtune sparkplug in a plug-hole and observed the colour of the ignition flame. Seems
OK - not obviously rich. As I needed a bit of darkness to properly see the flame through
the transparent spark plug, it was very handy that nature arranged a (near) total eclipse
of the sun at just the right moment! More sun-watching than tuning was done for a while.
Stuck the rubbery covers to the exposed front suspension nuts and
bolts. Also glued a bit of edge trim to the headlamp brackets, where they have contactable
sharp edges. I sprayed the front track rods with satin black paint, as the rods had got a
bit scratched when setting the tracking and the rod-ends were supplied unpainted.
 With nothing left to do, I stuck the 'Dax' badges to the wheel centres and
the rear panel. A nice chrome 'V8' badge keeps the rear panel badge company.
With nothing left to do, I stuck the 'Dax' badges to the wheel centres and
the rear panel. A nice chrome 'V8' badge keeps the rear panel badge company.
So - is that it? Is it finished? I think it's now all done! All
the items on my "don't forget to do" list have been crossed off.
2 days to SVA!
12/8/99
Last minute panic - the indicators have started flashing far too
fast, about 3 times a second! A quick trip to Halfords gleaned a new flasher unit
identical to the Dax-supplied one. When installed, the flash speed was back to normal.
Whew!
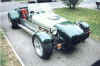 Gave the Dax a good wash and polish, ready for the Big Day.
Go on to the SVA Test itself
...