


|
|
|
Home |
21/12/98Visited Dax 5 minutes before they closed for Christmas. Bought a
Rush construction manual and had a very quick tour of the Visited James in Surrey, owner of a rebuilt Rover V8 engine & gearbox who was found through the 'Sevens' mailing list. Experienced the V8 in a Rover P6 - impressive even in 1.5 tons of old saloon :-) Decided to buy it and left a deposit. Engine is complete with lots of spares and all ancillaries for a drop-in installation. Collection will be in late January, when James has extracted it. Spent much of the Christmas holiday reading the manual. Most procedures are well described. Some (e.g. clutch hydraulics, fuel pump location) aren't even mentioned. I suppose I'll work it out as I go along ...
5/1/99Visited Dax properly this time. I was given a ride in the Cosworth demonstrator (K300 DAX) by Gary Sanders, Dax Chief Engineer. Quite an experience! The raw power and instant response made this quite a point, squirt and HANG ON machine! Gary couldn't use full power for more than 3 seconds at a time on the Essex country lanes. Even that was enough to add about 50mph to our speed. Obsession confirmed, I promptly ordered Build Pack 1 (the chassis and body) and left £200 deposit. Delivery time is 14 weeks :-( 10-21/1/99Painted garage ceiling. Gap-filled & draught-excluded garage door. Made a workbench by covering the old fridge, washing machine and dishwasher stored in the garage with a 6 x 2 foot slab of MDF one inch thick.. 23-24/1/99
Put up fluorescent lights in the garage. Installed a new fusebox for the extra sockets. 25-31/1/99Removed and cleaned the sump and crankshaft pulley. Ordered a Ford Sierra XR4x4 rear subframe from a breakers found using an internet search. Stripped and examined the clutch slave cylinder. Its condition was fine, so no overhaul is planned - just a clean-up and repaint. Fitted some new double sockets.
|
| Ford Sierra steering column, ignition switch (and key!), stalks, steering wheel and cowlings | |
| Mini heater and ducting tubes | |
| Mini wiper motor, clamp, rack and wheelboxes | |
| Ford Cortina Mk.V front subframe complete (from a 'Y'-reg 1.6 auto). This wouldn't fit in the car at the first attempt, so I left it there for a couple of days to be cut in half! Lucky I don't need the subframe or rack. |
Although Carl wouldn't negotiate on price (and was a bit over the top for such mundane bits), he threw in a Cortina Haynes manual. Oh well, at least Chesterton is very handy for me.
 Sierra XR4x4 rear subframe was delivered. A quick test of the limited-slip
diff, using a torque wrench on one of the hubs as recommended by the Haynes manual, showed
that it's in good condition. The discs aren't noticeably worn. Seems like a good 'un!
Sierra XR4x4 rear subframe was delivered. A quick test of the limited-slip
diff, using a torque wrench on one of the hubs as recommended by the Haynes manual, showed
that it's in good condition. The discs aren't noticeably worn. Seems like a good 'un!
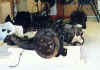
Dismantled rear right-hand caliper. All parts in good condition. I'll probably replace the seals just on principle. Cleaned the sump out.
Eventually removed the Sierra rear hub nuts. These were a real bugger to get off and friend John and I broke several sockets and extension bars before they finally freed up, with liberal doses of paraffin and heat (not at the same time though :-)
 Dismantled front left-hand hub and caliper. Got new brake pads and wheels
bearing kits for both front and rear.
Dismantled front left-hand hub and caliper. Got new brake pads and wheels
bearing kits for both front and rear.
Drifted out the front and rear left-hand bearing races. Replaced fronts. The new rear Sierra bearings I was given are wrong! I changed them for the correct ones, but the price jumped from £45 to £108 in the process! If I had known in advance how much new bearings were, I would probably have stuck with the donor ones, as they looked OK. As it was, I destroyed the oil seals (not available separately, have a nice day) getting the old bearings out.
Wire-brushed and painted the left-hand front uprights and rear bearing carriers.
My SVA manual arrived. It's well-written and very detailed. Very handily, it comes ready with a greasy-fingerprint brown cover.
Fitted replacement rear Sierra bearings to left-hand hub carrier. Dismantled and wire brushed front right-hand upright and caliper. Painted the upright.
Cut trestle legs to length and stacked ready for future assembly. Put another layer of MDF on the workbench.
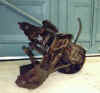
Wire brushed and painted the differential (silver Smoothrite), its cover and the sump (red engine lacquer). Had a go at polishing the thermostat housing and water pump using a drill-mounted polishing wheel and cutting resin. The results are quite shiny for a first attempt, although deep corrosion pits mar the effect somewhat.
Degreased the gearbox with paraffin. Fitted rear right-hand bearings.
Upon investigation, the gearbox front seal was leaking, so I removed the bellhousing, clutch arm and front plate. Drained several pints of blood (red auto transmission fluid) from the gearbox. Must get a new gasket and seal.
Polished one rocker cover. Very shiny! Painted some engine with the red lacquer. It will need two coats. Fitted the crud-catcher plate to the engine block.
Phoned an order to Rimmer Bros., the Triumph / Rover parts specialists. I ordered:
| Gearbox gasket and seal | |
| Sump plug (the one in my V8 was drilled for a sensor - big hole in sump = Bad Idea) | |
| Chrome 'V8' badge, as seen on Rover SD1s. To go on the back of the Rush to let you know what's just passed you ... | |
| Spigot bearing (missing, presumed forgotten) | |
| Exhaust manifold gaskets, studs and nuts |
 1-5/3/99
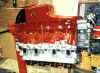 Painted
some more engine. It looks good with the block and sump red and the heads in bare alloy.
Painted
some more engine. It looks good with the block and sump red and the heads in bare alloy.
Can't shift the bloody little bolts holding the driveshafts together. Never mind, I can pack some fresh grease into the CV joints by pulling the gaiters back. The gaiters are OK so don't necessitate dismantling the shafts. Just as well, really.
Visited Carl Hollis breakers again, for hopefully the last time, to get:
| V8 engine mounts | |
| Mini heater 'fishtails' | |
| Rover coolant expansion tank | |
| Reversing light switch | |
| Heater valve from a dead VW (Polo?) |
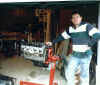
Cleaned these bits and rearranged the garage so I can paint half of the floor. Wired in the remaining sockets and built a cheap inspection lamp using a Homebase security light (whole light unit £3.79. Replacement bulb £3.99. Crazy? I should coco!).
Painted the engine mounts. Cleaned the Mini heater unit. I hope it fits! Dax want over £200 for their heater. I'll really try to use the Mini one before I give in ...
Kept painting sections of garage floor and rearranging the contents. Painting with the garage door shut (cold and dark outside) is No Good for your health, children. The vapours from the special floor paint sent me a bit funny for a while ;-) Having been there once, I bought a proper solvent-proof filter mask for the next session. I do learn, eventually.
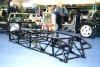 Visited the Stafford Kitcar show and saw my chassis on the Dax stand!
Confirmed delivery day as 26th March - over 2 weeks earlier than planned :-) Good job I'm
(almost) ready for it!
Visited the Stafford Kitcar show and saw my chassis on the Dax stand!
Confirmed delivery day as 26th March - over 2 weeks earlier than planned :-) Good job I'm
(almost) ready for it!
Kept cleaning and painting the engine and its ancillaries. Finished painting the garage floor at last.
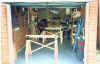 Delivery imminent! Finished making wooden trestles. You could dismantle a
tank on those :-)
Delivery imminent! Finished making wooden trestles. You could dismantle a
tank on those :-)
Please follow the continuing story of the delivery and build-up here.


 3-9/2/99