|
|
|
Home |
|
| Replacement side-panels | |
| Dashboard | |
| Radiator | |
| Fuel filler pipes | |
| Reflectors | |
| Self-tapping bolts | |
| Suspension shims | |
| Diff spacer tube | |
| Gearbox mounting and plate | |
| Headlamp brackets |
The following bits are still on order:
| Wheels | |
| Seats | |
| Handbrake and harness gaiters | |
| Instruments | |
| Propshaft |
Bought a reversing light to match the fog lamp. Also bought Dax's neat heater-vent finishers in stainless steel. I picked up my modified steering column, with a new extension splined shaft welded on the end.
With all next week off work, I'm hoping to make good progress on the build, including fitting the engine.
Fitted the extra floorpan rivets. I ran out of the large-head rivets supplied by Dax, but got another hundred from my local Aladdin's cave of a tool-shop. McKays of Cambridge.
Fitted rear fixed brake pipe. I'll leave the master cylinder end loose for now, until I know exactly where the pedal box will be. Manhandled the differential into place and bolted it in, using the rubber bushes supplied. It's a tight fit and I had to re-bend the brake pipe to clear part of its casing.
Received a parcel of bits from Europa, including the fuel pipe. That was holding up the engine installation so now that can progress!
Fitted the main fuel pipe (pump to carb) using rubber-covered aluminium P-clips from Europa.
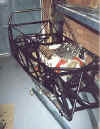 With friend John's help, fitted the spigot bearing, clutch, gearbox and
bellhousing to the engine. Lowered the whole engine / gearbox assembly into the chassis,
which had the engine mounts already bolted loosely in. Held our breath and ... it fitted!
First time as well! It was surprisingly easy to manoeuvre the massive unit into place. Not
having the gearlever extension housing on the 'box helped enormously, as this allowed
the 'box to slip under the scuttle chassis tube with only minor pushing and pulling.
With friend John's help, fitted the spigot bearing, clutch, gearbox and
bellhousing to the engine. Lowered the whole engine / gearbox assembly into the chassis,
which had the engine mounts already bolted loosely in. Held our breath and ... it fitted!
First time as well! It was surprisingly easy to manoeuvre the massive unit into place. Not
having the gearlever extension housing on the 'box helped enormously, as this allowed
the 'box to slip under the scuttle chassis tube with only minor pushing and pulling.
However, with it all in, several things became apparent. We will have to remove the engine again, in order to:
| Fit the triangular footwell panels and the driver's footwell end panel (inaccessible once the bellhousing is in place) | |
| Lower the fuel pipe in one place where a bit of the gearbox is resting on it (and/or grind that bit of gearbox off :-) | |
| Fit the front fixed brake pipes (access is tight once the engine is in) |
The foot well panel must have a hole drilled for the steering column to pass through. This can only be done by trial fitting the column, which can only be done with the engine in place. So it worked out quite well, really! I had assumed that we would have to put the engine in and take it out two or three times. Maybe it will only be two...
Trial fitted the steering column and rack and measured for the hole in the driver's footwell panel. Removed the column, rack and engine. Lowered the offending fuel pipe clip as far as possible - until the pipe is only just higher than the bottom of the floorpan, for protection against being grounded.
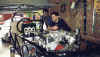
The triangular footwell panels needed quite a bit of filing (and angle-grinding :-) in order to make them fit snugly against the chassis tubes. The fit here is critical, as the bellhousing comes very close to the panels and the chassis, about a quarter of an inch in a couple of places. Fitted the triangular panels using more messy Wurth adhesive (Black Death in a tube), self-tapping bolts and rivets.
Visited the Chatham Kitcar show. Bought fuel pipe and filter, dashboard vinyl and other assorted small bits.
Bent front fixed brake pipes to shape. Drilled holes for their clips. Painted the drive shafts.
Refitted engine & gearbox, with starter motor fitted as well. The offending bit of the gearbox was ground off after all :-) It's still very tight, well OK - actually touching, in a couple of places, but only fibreglass panels inside the transmission tunnel, not any chassis members.
Cut a brackety-type corner off the left-hand cylinder head where it was very close to a chassis member. I hope this is the only corner-cutting that will have to be done (groan!). Also bevelled a bellhousing bolt head that was too close to the passenger's footwell panel. Painted the drive shafts.
 We lifted the chassis back onto its trestles with the aid of the engine
crane. Even with the engine, gearbox and diff in, John & I could just lift it
enough to position it properly on the trestles! It was a bit of a heave though, as the
chassis must now weigh over a third of a ton. Guess we're just too macho ... :-)
We lifted the chassis back onto its trestles with the aid of the engine
crane. Even with the engine, gearbox and diff in, John & I could just lift it
enough to position it properly on the trestles! It was a bit of a heave though, as the
chassis must now weigh over a third of a ton. Guess we're just too macho ... :-)
 Removed
all the diff bolts in order to get the lower rear wishbone front mounting bolts in
(phew!). The diff also had to move a bit for the left-hand drive-shaft to clear a chassis
rail and slip into place. Re-bolted the diff in. Fitted both drive-shafts, their circlips
and the diff rear cover.
Removed
all the diff bolts in order to get the lower rear wishbone front mounting bolts in
(phew!). The diff also had to move a bit for the left-hand drive-shaft to clear a chassis
rail and slip into place. Re-bolted the diff in. Fitted both drive-shafts, their circlips
and the diff rear cover.
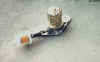
Sussed out a place to mount the fuel pump. No guidance on this is given by the build manual, but there's a handy space just behind the diff with some chassis rails and bracing plates to fasten it to, via some rubber bobbins and a home-made ali bracket.
 Cut
the hole for the steering column in the driver's footwell end panel. Glued in a grommet
with some Black Death. Progress slowed to a bit of a crawl on Saturday afternoon as eight
visitors turned up to my impromptu 'open day' for friends and Sevens List members.
Cut
the hole for the steering column in the driver's footwell end panel. Glued in a grommet
with some Black Death. Progress slowed to a bit of a crawl on Saturday afternoon as eight
visitors turned up to my impromptu 'open day' for friends and Sevens List members.
 Fastened the steering column bracket to its chassis tubes with rivets and
more Black Death. Put together the steering column, UJs and rack. Cut the column extension
to length and slotted it to allow the UJ bolts to pass though. Meanwhile, friend John made
a natty ali bracket for the fuel pump and we fasted it in, supported by rubber bobbins to
the rear chassis
Fastened the steering column bracket to its chassis tubes with rivets and
more Black Death. Put together the steering column, UJs and rack. Cut the column extension
to length and slotted it to allow the UJ bolts to pass though. Meanwhile, friend John made
a natty ali bracket for the fuel pump and we fasted it in, supported by rubber bobbins to
the rear chassis rail.
Plumbed in the pre-pump filter and connected the pump to the main fuel pipe. Still got to
suss out how to connect the 0.5" tank outlet to the 8mm filter inlet.
rail.
Plumbed in the pre-pump filter and connected the pump to the main fuel pipe. Still got to
suss out how to connect the 0.5" tank outlet to the 8mm filter inlet.
Cut a clearance hole in the scuttle moulding so that it fits properly over the pedal box mounting rails. Sat the transmission tunnel moulding in place for no good reason. Put the radiator in position to check what length and diameter hoses I will need.. Hmm ... different diameters, tortuous routes, unknown expansion bottle plumbing, no guidance from the manual. Another probl - er - opportunity!
While the tunnel was on, I thought about where to put the heater. During a quick surf, I found Ian Crocker's SEiGHT page and liked the look of what Martin Hill did to a mini heater ;-) An idea worth 'borrowing'. Thanks Martin!
Emptied the carrier bag full of wires onto the lounge floor and went through the instructions wire by wire, to be sure that I understand what's what and that nothing's missing. That's a whole lot of wires for such a simple car!
Fixed steering column and rack in place. Trial fitted handbrake and worked out where its cable needs to pass through the transmission tunnel top.
Bolted the pedal box in place. Dax give the exact position (fore and aft) for this and it seems a reasonable fit to my leg length, with a seat-simulator (old pillow) in place. However, it needs to be so far to the right-hand side, in order that the brake pedal doesn't rub on the steering column, that its mounting bolts are very close to the edge of the support rails. A little bolt or rail modification may be needed ...
Ordered some parts from Europa, including a 12" leather Mountney steering wheel and flexible radiator hoses.
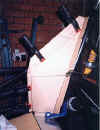
Put a side-panel in place, just for the hell of it. A bit of cutting at the front edge (hidden inside the nose moulding) was necessary to clear a couple of chassis tubes. Other than that, it's a good fit. Because it's much thinner than the usual fibreglass side-panels, it can't go tight against the chassis sides, or else the bottom edges of the scuttle will stick out further than the sides! There's plenty of material to allow this, though. It will also allow one standard British Tad of extra width in the cramped footwells :-)
Mr. Angle Grinder met Ms. Support Rail and the union produced the patter of many tiny sparks, as I relieved the rail until the pedal box mounting bolts would fit. Re-fitted the pedal box. Fitted 2 brake and 1 clutch master cylinders. Bent the throttle pedal a bit more than as supplied, to give more distance from the brake pedal. I have no idea how you drive a Rush if you have feet any bigger than my dainty size 8's. Perhaps barefoot ... ?
Gunged up a few stray holes in the driver's footwell with Black Death. Got it all over me, my clothes and all car parts in sight. As usual :-(
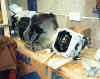
 Fitted
the inlet manifold and its gasket. Bolted the carburettor down to it. Friend John bent the
final bit of the rear brake pipe, where it meets the master cylinder, only to find that
it's about 4 inches too short! Damn! Bugger! We could re-route it up the driver's footwell
end to shorten its run, but it wouldn't look very neat. Better ask Dax.
Fitted
the inlet manifold and its gasket. Bolted the carburettor down to it. Friend John bent the
final bit of the rear brake pipe, where it meets the master cylinder, only to find that
it's about 4 inches too short! Damn! Bugger! We could re-route it up the driver's footwell
end to shorten its run, but it wouldn't look very neat. Better ask Dax.
Decided to re-route the fuel pipe in the engine bay, to get it away from the exhaust pipes and to shorten it a bit. Did so, although access was very tight because the engine's in the way. Moral: get it right first time!
After speaking to Gary at Dax, I learned the following:
| He often routes the brake pipe down a diagonal tube in the tunnel, to gain a few extra inches, | |
| All my remaining Dax parts are ready, except the wheels which should be in Friday :-) | |
| It's usual for the pedal box on V8 cars to be offset to the right. This is because it must clear the steering column, which in turn must clear an engine bay chassis tube which is moved to allow the V8 to fit in, | |
| It's usual for the steering wheel on all Rushes to be offset to the left a little. This allows space between the wheel and the sidescreens for the driver's knuckles! |
Received some parts from Europa, including a steering wheel boss, but no wheel. To follow, I hope.
Removed , straightened (carefully!) and refitted the main rear brake pipe according to Gary's new route. It now fits like a ... brake pipe which is the right length. Fitted the 3 front fixed brake pipes in place and connected both brake master cylinders. Noticed that these are different sizes - one is 0.75" bore and the other is 0.625". Another question for Gary when I go to pick up my bits: which cylinder is for the front and which for the back?
 Remade and fitted the left-hand shoulder panel in aluminium, using a
cardboard template to get it right. The new version is neater than the old one and has
substantial flanges to attach the backrest to. Made the remaining fuel pipe connection
from tank to pre-pump filter.
Remade and fitted the left-hand shoulder panel in aluminium, using a
cardboard template to get it right. The new version is neater than the old one and has
substantial flanges to attach the backrest to. Made the remaining fuel pipe connection
from tank to pre-pump filter.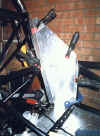
Remade and fitted the right-hand shoulder panel. Started filing away at the backrest panel to fit between the new shoulder panels and to clear the various welds and brake pipes in the vicinity.
Go on to May's progress.
 1/4/99