
|
|
|
Home |
|
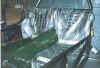
| Seats (lovely in black with BRG piping) | |
| Propshaft | |
| Instruments and senders | |
| Handbrake gaiter |
 My wheels still aren't in, as aren't the harnesses. I ordered a carpet set
(in black, with BRG piping, of course) which will take 2 - 3 weeks to arrive, so I'll
collect all the remaining bits together. Hopefully.
My wheels still aren't in, as aren't the harnesses. I ordered a carpet set
(in black, with BRG piping, of course) which will take 2 - 3 weeks to arrive, so I'll
collect all the remaining bits together. Hopefully.
Found some answers to burning questions by chatting to Gary:
| The larger brake master cylinder feeds the front brakes. That'll need changing over, then :-( | |
| The bonnet stiffeners run under the top of the bonnet, not along the bottom edges as I'd thought |
As always, Gary was in blue-assed fly mode. He took a young bloke for a spin in K300 DAX (the Cosworth demonstrator) as he did for me. I wonder if the victim placed an order ... ? I left my thermostat housing with Gary, for him to cut & shut it to help avoid a high-point (and attendant air-lock) in the top rad hose. They'll post it back to me.
 On
return, Friend John made up an aluminium pedal box mounting cover plate (the thing that
stops gouts of flame from a burning engine toasting your feet until crispy. It needs slots
for the pedals, of course, but it should help separate the driver from the engine bay
somewhat, and it smartens up that area. I bolted the propshaft in and then cut and filed
the tunnel moulding until it would sit flush to the floor and the backrest. Cut some holes
for grommets to pass the handbrake cable and speedo cable.
On
return, Friend John made up an aluminium pedal box mounting cover plate (the thing that
stops gouts of flame from a burning engine toasting your feet until crispy. It needs slots
for the pedals, of course, but it should help separate the driver from the engine bay
somewhat, and it smartens up that area. I bolted the propshaft in and then cut and filed
the tunnel moulding until it would sit flush to the floor and the backrest. Cut some holes
for grommets to pass the handbrake cable and speedo cable.
I want the tunnel to be removable in the future, as things like the reversing light switch and gearlever extension can't be reached any other way (short of taking the engine out :-). I'll use self-tapping bolts to hold it to the chassis rails at floor level. However, there's nothing good to fasten it to under the scuttle and I don't want to use Black Death because then nothing short of a small nuclear event could shift it! Hmm ...
Found the threads on the oil pressure gauge T-piece are wrong for my Rover oil pump. I'll have to see if Dax can exchange it for the right one.
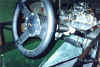 Got my Mountney steering wheel through the post from Europa Spares. It's
black leather, polished spokes, 12 inch and completely SVA incompatible. Since I don't
want to SVA the Dax with the old Sierra wheel in place (it's UGLY and so big it fouls the
gear lever), I'll make a pad out of foam and vinyl to cover the spokes and boss. It would
be a shame if it 'fell off' afterwards though ;-) Fitted the wheel and sat in the car for
a while playing with it.
Got my Mountney steering wheel through the post from Europa Spares. It's
black leather, polished spokes, 12 inch and completely SVA incompatible. Since I don't
want to SVA the Dax with the old Sierra wheel in place (it's UGLY and so big it fouls the
gear lever), I'll make a pad out of foam and vinyl to cover the spokes and boss. It would
be a shame if it 'fell off' afterwards though ;-) Fitted the wheel and sat in the car for
a while playing with it.
 Fitted John's pedal box cover plate with more rivets and BD. Refitted the
pedal box and swapped the brake master cylinders over.
Fitted John's pedal box cover plate with more rivets and BD. Refitted the
pedal box and swapped the brake master cylinders over.
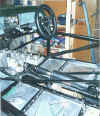
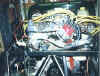
Found a place to fit the remote oil filter head - just in front of the engine, on the left-hand side of the engine bay. I've got the filter hanging downwards to keep filter changing less messy, although space is so tight I'll have to drop the filter out of the bottom of the car to remove it!
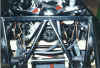 Fitted the oil pipes from oil pump to remote filter. Fastened these with
cable-grips to handy chassis tubes between the engine and radiator. Checked the tightness
of all oil-related bolts and filled the engine with 6 litres of Castrol GTX. Temporarily
connected the oil pressure gauge and its pressure tube to the oil pump, using the
water-temperature sender adapter supplied by Dax (wrong threads also for the water sender,
but coincidentally right for the oil sender!).
Fitted the oil pipes from oil pump to remote filter. Fastened these with
cable-grips to handy chassis tubes between the engine and radiator. Checked the tightness
of all oil-related bolts and filled the engine with 6 litres of Castrol GTX. Temporarily
connected the oil pressure gauge and its pressure tube to the oil pump, using the
water-temperature sender adapter supplied by Dax (wrong threads also for the water sender,
but coincidentally right for the oil sender!).
The front 4-way brake pipe T-piece was very close to the oil pump (like 3mm). I managed to move it about an inch further forward without having to do more than adjust a few pipe bends.Hopefully the brake switch won't get knocked off if the engine surges forwards. With over 3.5 litres of V8, that's a lot of potential surge!
Since the Rover V8 oil pump doesn't self-prime, you need to prime it either the old-fashioned way, by packing it with Vaseline, or using a special tool (a steel rod with a slot in the end) to spin the pump using an electric drill, accessed through the distributor hole. I did the latter. I gingerly spun up the pump (clockwise, after checking with Mr. Haynes :-) until I felt some resistance. At that point, the oil pressure gauge started registering. It reached 50PSI with the drill running flat out and oil appeared around all of the rockers! Felt unjustly proud of this achievement :-)
Fixed some of the rear loom inside the transmisson tunnel and around the fuel tank.
Connected the reversing light switch to the loom as it runs through the tunnel. Adjusted the switch using a multimeter to tell me when it was working. Fastened the loom to the passenger's footwell side panel. Here, it will be inside the car, but runs underneath an overhanging tube so it won't be seen. Used some blobs of BD to make sure it will not be going anywhere. Used more BD to gunge up some remaining holes in the passenger footwell.
Removed and re-attached the handbrake properly. Sorted out how its gaiter fits. I'll Velcro it to the under-scuttle rail, using contact adhesive to stick the velcro down.
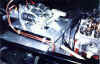
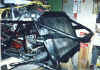
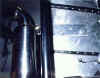
Trial fitted the right-hand exhaust down-pipes while John made some aluminium sandwich plates to strengthen the exhaust bracket where they bolt to the floor panels. Fitted the exhaust, only to find it pointing downwards too much to 'encourage' by lifting into the correct position. The only solution was to oval the holes in the manifold flanges a bit, to allow each pipe to rotate a few degrees. Eight holes, each made of quarter-inch stainless steel - that took a lot of effort but in the end the exhaust fitted up to the floorpan OK.
Fitted the tunnel moulding after cutting a hole for the gearlever. This is self-tappered to the lower chassis rails, riveted to the backrest and (will be) riveted to the underneath of the battery shelf. Water ingress was prevented with some non-hardening not-very-sticky mastic, squirted in by applicator gun. If I ever want to remove the tunnel, I'll have to drill out the rivets, but it's better than having bolt-heads under the seat backs.
 Cleaned the donor Mini wiper motor and wheel boxes. Carefully drilled the
holes in the scuttle top for the wiper spindles. Trial fitted the wheelboxes, which
involved carving the rubber spacers quite a lot, as the spindles come through the scuttle
at quite a different angle to the original Mini. Stuck the hot air 'trough' under the
scuttle with some BD. The flared metal tube between the wiper motor and the left-hand
wheel box is, believe it or not, too short! I couldn't believe that anything from a 'real'
car would be too small for the Dax! I'll get some 0.25" copper tube to replace it. It
will be easier than bending and flaring the donor's steel tube.
Cleaned the donor Mini wiper motor and wheel boxes. Carefully drilled the
holes in the scuttle top for the wiper spindles. Trial fitted the wheelboxes, which
involved carving the rubber spacers quite a lot, as the spindles come through the scuttle
at quite a different angle to the original Mini. Stuck the hot air 'trough' under the
scuttle with some BD. The flared metal tube between the wiper motor and the left-hand
wheel box is, believe it or not, too short! I couldn't believe that anything from a 'real'
car would be too small for the Dax! I'll get some 0.25" copper tube to replace it. It
will be easier than bending and flaring the donor's steel tube.
 So where are we, in the grand scheme of things? John and I sat in the new
seats and decided that we would try for first engine start-up next weekend and, if
successful, would declare the half-way point and apply for an SVA test, knowing that there
is roughly an eight-week waiting list with only six weeks elapsed so far.
So where are we, in the grand scheme of things? John and I sat in the new
seats and decided that we would try for first engine start-up next weekend and, if
successful, would declare the half-way point and apply for an SVA test, knowing that there
is roughly an eight-week waiting list with only six weeks elapsed so far.
Those who have paid close attention to the preparation page will know that I never cleaned or reconditioned the rear brake calipers (Sierra XR4x4). This was because I'd had a rumour of some ready-reconditioned ones from a friend of a friend, for a lot less than Ford wanted for the rebuild kits alone! Well, I actually received two shiny calipers via Gareth at work. These are reconditioned by Lockheed and are indistinguishable from new ones. Thanks Gareth!
Painted the clutch slave cylinder with brake lacquer (gold) to try it out. Looks OK! Fitted the cylinder. Received a nice Aeroquip clutch hose, an air filter and a low-profile rocker breather from Rimmer Bros. Fitted the hose to the slave cylinder, but the top end is the wrong thread to fit into the Dax-supplied clutch master cylinder. I finally figured out what the thread should be and ordered a male-to-male JIC-4 to JIC-3 hose adapter from Think Automotive, whose catalogue I'd had the luck to order from their website some time ago.
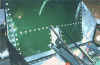
Trial fitted the windscreen and pillars to the scuttle, in order to work out where its mounting holes go, one of which also holds the wiper motor in.
 Had to remove the damn tunnel again :-( I'd forgotten to torque up the
rear wishbone nuts, whose bolt-heads can only be gripped with the tunnel off. Off it came,
up they were torqued and on it went again. Only an hour lost there. The left-hand exhaust
and downpipes went on very easily. No filing needed this side :-) Attached the main
battery positive red cable to the starter motor solenoid. Earthed it via a fat black
cable. Grounded the fuel pump -ve wire to the chassis and attached its +ve wire to the
loom. I tested the pump by holding the loom ends to the battery. It spins!
Had to remove the damn tunnel again :-( I'd forgotten to torque up the
rear wishbone nuts, whose bolt-heads can only be gripped with the tunnel off. Off it came,
up they were torqued and on it went again. Only an hour lost there. The left-hand exhaust
and downpipes went on very easily. No filing needed this side :-) Attached the main
battery positive red cable to the starter motor solenoid. Earthed it via a fat black
cable. Grounded the fuel pump -ve wire to the chassis and attached its +ve wire to the
loom. I tested the pump by holding the loom ends to the battery. It spins!
 Fixed the battery shelf on with BD and rivets. Poured 5 litres of unleaded
into the tank. John and I then spent a while with multimeter in hand, calibrating the fuel
sender so that the gauge would read empty with just this amount of fuel as a reserve.
Calibrating means bending the ballcock-like float arm until it gave us 200 ohms
resistance, which is what's needed for a reading of empty. Unfortunately, a full tank of
fuel will only give a reading of 3/4 on the gauge. I'll fix this later if it bugs me
enough. It's more important to know where empty is!
Fixed the battery shelf on with BD and rivets. Poured 5 litres of unleaded
into the tank. John and I then spent a while with multimeter in hand, calibrating the fuel
sender so that the gauge would read empty with just this amount of fuel as a reserve.
Calibrating means bending the ballcock-like float arm until it gave us 200 ohms
resistance, which is what's needed for a reading of empty. Unfortunately, a full tank of
fuel will only give a reading of 3/4 on the gauge. I'll fix this later if it bugs me
enough. It's more important to know where empty is!
We used the fuel pump once more to pump the petrol back into its carrying can, via the filter and main fuel pipe. It did this in about 50 seconds. That's quite a flow rate! It's looking good for an engine fire-up this weekend ...
The beast speaks! And it has a thunderous voice :-)
 Checked that all the battery shelf contents would fit (battery,
brake/clutch reservoir. washer bottle, expansion tank). Cleaned the distributor and its
cap, rotor arm and leads. John drilled the scuttle and trial-fitted the dashboard moulding
in place.
Checked that all the battery shelf contents would fit (battery,
brake/clutch reservoir. washer bottle, expansion tank). Cleaned the distributor and its
cap, rotor arm and leads. John drilled the scuttle and trial-fitted the dashboard moulding
in place.
 After having a hard think about the cooling system, we visited Hollis
breakers again. This time we picked up an expansion bottle (from a Vauxhall Cavalier)
which has an additional connection for the bottom radiator hose, so that you can actually
fill the thing! We'll make up a T-piece out of steel for the bottom hose to attach to the
bottle. Good thing John has a welder.
After having a hard think about the cooling system, we visited Hollis
breakers again. This time we picked up an expansion bottle (from a Vauxhall Cavalier)
which has an additional connection for the bottom radiator hose, so that you can actually
fill the thing! We'll make up a T-piece out of steel for the bottom hose to attach to the
bottle. Good thing John has a welder.
Got the clutch hose adaptor and fitted it. Apart from a fluid reservoir, I'd have a working clutch.
 We rigged up a temporary ignition system using odd bits of wire. I cranked
over the engine without plugs until some oil pressure registered. After statically setting
the timing to 6 degrees BTDC, we switched on the fuel pump, connected the coil, touched
the starter wire to the battery and ... VROOM! It fired on the first turn.
We rigged up a temporary ignition system using odd bits of wire. I cranked
over the engine without plugs until some oil pressure registered. After statically setting
the timing to 6 degrees BTDC, we switched on the fuel pump, connected the coil, touched
the starter wire to the battery and ... VROOM! It fired on the first turn.
I couldn't run it for long, as there is no cooling system, but did run it for half a minute, long enough to hear the glorious thundering crackle through the Dax sidepipes. Whilst running, the oil gauge registered over 50 PSI, which is just where it should be. Went to bed that night very happy :-)
The rocker covers were polished and fitted properly, as was the water pump. John tried to make some tubing for the wiper rack, but had little luck. The original steel tubing is too tough and some ali tube I picked up crumpled rather than bending :-( Ideally, we need thick-walled 0.25" copper tube. Maybe McKays ...
Cut some flanges from the back of the nose-cone and propped it in place. Knowing how long the bonnet is allows us to judge exactly where the scuttle should be fastened down. Looks like it will all fit where it's supposed to (thank you Dax).
Received my SVA application form in the post.
![]() I had the answer to the wiper rack problem all along. Some 1/4"
plastic fuel tubing that came with the engine proved the ideal stuff. I flared its ends by
heating over the gas hob in my kitchen and rotating a bent 6" nail in the end of the
tube. Installed the wiper motor and all three bits of tubing for the rack. Ran temporary
wires to the battery and proved that the motor works at both speeds.
I had the answer to the wiper rack problem all along. Some 1/4"
plastic fuel tubing that came with the engine proved the ideal stuff. I flared its ends by
heating over the gas hob in my kitchen and rotating a bent 6" nail in the end of the
tube. Installed the wiper motor and all three bits of tubing for the rack. Ran temporary
wires to the battery and proved that the motor works at both speeds.
Positioned the scuttle carefully by taking lots of measurements to various points on the chassis, to get it square. Drilled through the scuttle flange and into the chassis rails. Put a few self-tapping bolts in to hold it for now.
 Made ali brackets to hold the brake fluid reservoir / washer bottle and
the expansion bottle to the battery shelf. Refixed the loose end of the engine earthing
strap to a convenient chassis rail. Plumbed in the front fuel filter and fastened the pipe
around it to the front of the battery shelf.
Made ali brackets to hold the brake fluid reservoir / washer bottle and
the expansion bottle to the battery shelf. Refixed the loose end of the engine earthing
strap to a convenient chassis rail. Plumbed in the front fuel filter and fastened the pipe
around it to the front of the battery shelf.
 Received my modified thermostat housing from Dax, after the second phone
call to ask where it was. They cut off the old neck and welded on a new piece of
thick-walled aluminium tube at a flatter angle. It polished up nicely with my
drill-mounted polishing mop. I fitted it, the radiator and the top Vulcoflex hose. It's
getting quite crowded in front of the engine now!
Received my modified thermostat housing from Dax, after the second phone
call to ask where it was. They cut off the old neck and welded on a new piece of
thick-walled aluminium tube at a flatter angle. It polished up nicely with my
drill-mounted polishing mop. I fitted it, the radiator and the top Vulcoflex hose. It's
getting quite crowded in front of the engine now!
 With the help of John and his welder, we made a T-piece out of a bit of
1.5" steel tube and some 0.5" steel tube. These were welded together and a bead
run around each opening to help retain the hoses. Gave it a smart coat of engine black
paint and fitted it the next day, with the bottom hose made of a bit of Vulcoflex and a
bit of the donor pipe.
With the help of John and his welder, we made a T-piece out of a bit of
1.5" steel tube and some 0.5" steel tube. These were welded together and a bead
run around each opening to help retain the hoses. Gave it a smart coat of engine black
paint and fitted it the next day, with the bottom hose made of a bit of Vulcoflex and a
bit of the donor pipe.
Not recognising the alternator's connections, I tested it by spinning it with a drill and measuring its output, which peaked at nearly 30 volts! Not good for other components on board. I surmised that it needed an external voltage regulator and the next day I exchanged it at the Cambridge Lucas centre. Prepared to pay the thick end of a hundred quid, I was pleasantly surprised when the replacement turned out to be about £37! It helped that the old chap on the counter recognised my Rover P6-vintage alternator and could give me a suitable modern replacement of the same physical size and with newer-style connections suitable for the plug supplied with the Dax loom. He took the old one as an exchange item and even changed its fan blades over for free! Try getting that sort of service from some spotty oik in Halfords!
Not a lot of progress the last few days, due to other activities like meeting the local Cambridge 'Sevens' group for an evening at the pub.
 Finished bolting the exhaust brackets to the floor pans as this will be
tricky after the side panels go on.
Finished bolting the exhaust brackets to the floor pans as this will be
tricky after the side panels go on.
I applied for my SVA test! I requested 20th July as the date so we'll see whether they can accomodate me. I opted for the London (Yeading) test centre, as that's where Dax take their cars and Gillingham, Kent, as my second choice as I have family very close to there.
Fastened ignition coil, ballast resistor and Kenlowe fan thermostat to chassis. The thermostat has a sensor on a long copper tube that gets inserted into the top radiator hose, using a small rubber 'saddle' with a groove to pass the tube under the jubilee clip. On three separate occasions I went into the garage to find that this saddle had slowly oozed out of the joint under the pressure of the clip and had to be re-inserted with lots of gasket sealant. Should have used BD!
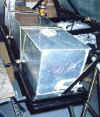
 I made a heater unit, using the matrix taken from the Mini heater, two PC
cooling fans to blow air into it and the hot air pipes from the Mini. This all fits into
an aluminium box, riveted together and sealed with silicone. It shifts as much air as my
MG heater used to!
I made a heater unit, using the matrix taken from the Mini heater, two PC
cooling fans to blow air into it and the hot air pipes from the Mini. This all fits into
an aluminium box, riveted together and sealed with silicone. It shifts as much air as my
MG heater used to!
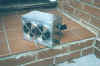 It measures about 8" by 6" by 5" and fits high up under the
passenger side of the scuttle as if it was made to fit. Which it was :-)
It measures about 8" by 6" by 5" and fits high up under the
passenger side of the scuttle as if it was made to fit. Which it was :-)
I've got the week off work and my brother Jim is here helping me. Jim gave the steering column cowling a bit of a seeing to with a hacksaw, until it cleared the handbrake. We fitted the handbrake gaiter using Velcro to attach it to the chassis rails.
I was hopeful of collecting the final bits from Dax this week (wheels, seat belts, carpets) but they aren't ready and Simon can't give me a guess when they will be. Ho hum. I'll wait for the call, I guess. It's not Dax's fault, it's their suppliers not getting their fingers out ...
Made up a throttle cable from a bicycle brake cable and modified the throttle pedal to take the 'barrel' on the end of the cable. Chopped a few inches out of the middle of the gearlever and asked Friend John very nicely to weld the two bits back together again, to create a custom shortened lever (i.e. one that doesn't hit the steering wheel when you put it into 5th :-).
Removed the exhausts (after measuring for where they come through the side panels). Trial fitted both side panels and glued some wing piping to the scuttle, ready for fixing down.
Go on to June's progress.
 3-4/5/99