 1-2/7/99
Continued to bleed the clutch hydraulics. As soon as the pedal
got too firm to push by hand, I got into the cockpit and pushed it with my foot. Instead
of activating the clutch, the slave cylinder pushed itself off the bellhousing with a sad
grinding of torn threads. Double bugger! I knew the bolts hadn't the best grip in the
bellhousing but still ...
 Luckily, friend Wayne turned up at that point and saved my frustration by
fastening the cylinder back on, by drilling through the blind holes and using longer
through-bolts. Thanks Wayne! Meanwhile, I assembled more of the front left-hand suspension
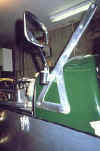
and fitted the windscreen and mirrors.
Luckily, friend Wayne turned up at that point and saved my frustration by
fastening the cylinder back on, by drilling through the blind holes and using longer
through-bolts. Thanks Wayne! Meanwhile, I assembled more of the front left-hand suspension
and fitted the windscreen and mirrors.
Together we bled the clutch and brakes until the fluid ran clear.
Unable to resist, we fired the engine up and tried to put it into gear using the clutch.
Reluctant at first, it got a bit easier (i.e. less grinding noises from reverse) as we
tried a few times. Seems to be getting there. Another bleedin' session will be on the
cards when any air has had time to settle.
Ordered some tyres from Elite Tyres. Mail-order is much cheaper!
They'll be here Monday. Needless to say, I haven't got any wheels to put them on. SVA
postponement is inevitable. Feeling a bit miffed with Dax / Image - they've only had my
order (and my money) for three and a half months :-(
Made a small ali bracket to hold the radiator top hose off the
fan belt. During the previous hot run, the hose had drooped a bit and the fan belt ate a
small piece of it. I'm really getting to be a dab hand at whistling up ali brackets!
3-6/7/99
Fitted and wired the rear fog lamp. Fitted the side indicator
repeaters.
Wayne fitted the handbrake cable and the cycle wing supports. I
fitted the front bumper bar side/indicator lamps and the headlamps. Glued some carpet to
the driver's footwell sides.
Received the tyres (Bridgestone S-02 Pole Positions).
With only 2 weeks to go until SVA and no wheels, I decided I had
to postpone. I rang the Vehicle Inspectorate and re-scheduled for the next available slot,
on Friday 13th (!) August. Of course, Sod's Law came into play and the wheels were
delivered to work only ten minutes later! I called the VI back to try to reinstate my
original date, but they had already given it away to someone requesting a cancellation :-(
13th August it is, unless I pull the same trick and get a cancellation. We'll see ...
With the help of Chris and his large Volvo (again), we got the
tyres mounted on the wheels at TC Tyres in Cambridge. That evening, I removed the
nose-cone (to get access to the sturdy, graspable bits), replaced the dashboard (which had
been removed for carpeting activities) and tidied the crap out from under the car. People
started turning up. Chris and John put the front wheel studs (longer than the original
Cortina ones) through the front hubs and bolted all four wheels on.
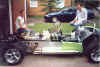
 The engine hoist held the rear end up, chained around the roll bar, while
we removed the rear trestle. With 6 blokes heaving on the front end, one girl on
trestle-removal and another on camera duty, we lowered the front end to the ground,
followed by craning the back end down. It sat on its own wheels for the first time!
Initial impression? It's tiny! After months of having it at chest height, it's strange
when it stands no higher than my belt buckle.
The engine hoist held the rear end up, chained around the roll bar, while
we removed the rear trestle. With 6 blokes heaving on the front end, one girl on
trestle-removal and another on camera duty, we lowered the front end to the ground,
followed by craning the back end down. It sat on its own wheels for the first time!
Initial impression? It's tiny! After months of having it at chest height, it's strange
when it stands no higher than my belt buckle.
 We pushed it backwards out of the garage. I adjusted the pre-load on the
clutch pedal to get a better bite and reversed it a yard or two. Not being familiar with
the clutch 'feel', I let it in a fraction too quickly. Result: instant wheelspin and all
onlookers diving for cover :-)
We pushed it backwards out of the garage. I adjusted the pre-load on the
clutch pedal to get a better bite and reversed it a yard or two. Not being familiar with
the clutch 'feel', I let it in a fraction too quickly. Result: instant wheelspin and all
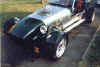
onlookers diving for cover :-) 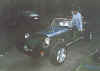 We replaced the nose cone and bonnet and went for a short test drive along
the cul-de-sac. The suspension is set at its highest and hardest, the front wheels have
wild toe-in, we were grit-blasted by the front tyres, the brakes were spongy but the grin
never left my face.
We replaced the nose cone and bonnet and went for a short test drive along
the cul-de-sac. The suspension is set at its highest and hardest, the front wheels have
wild toe-in, we were grit-blasted by the front tyres, the brakes were spongy but the grin
never left my face. 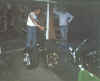 A
celebratory beer all round followed, during which the Dax was christened 'Jadzia'
with some bottled lager over its (her) nose cone. Well, if you watch Trek, there's only
one choice ... ;-)
A
celebratory beer all round followed, during which the Dax was christened 'Jadzia'
with some bottled lager over its (her) nose cone. Well, if you watch Trek, there's only
one choice ... ;-)
Even in the 50 yards available, a mild prod of the throttle had
the back tyres spinning. Acceleration can only be described as brutal! However, the
thunder from the exhausts must have angered the rain gods who promptly sent a thunderstorm
for us, so the activities were curtailed and I drove Jadzia back into the garage.
Thanks to John, Jessica, Dave, Belinda, Chris, Wayne and Jim (a
local 7's lister) for their efforts this momentous evening.
7-13/7/99
Not a lot of progress lately, due to my old MG (plus sister)
coming back to visit. It's MOT time again and I spent a few days underneath the MG to make
it pass.
With the help of Marc,
I measured the hub to ground distance and we measured that 6 revolutions of the road
wheels equals 7.6 turns of the speedo cable. This information is needed to get the speedo
recalibrated. Bled the front brakes again.
Received my water temperature sensor back from Dax and an adaptor
from Think Automotive. Although not a perfect
fit, I worked them together, with some red gobbo until they were good and tight. Sent the
speedo off to Speedy Cables for recalibration. ETA 2 weeks.
Measured the ride height, which had been set at maximum for the
lift-down. The front was already in range but I had to soften the rear right off to get it
(almost) down to its maximum height. Hopefully it'll settle a bit with use. The front
wheels have negative camber and the rears have positive.
14-18/7/99
The new water temperature sender from Dax is duff! when I dangled
it in boiling water, it had a resistance waaay too high. It would have the gauge reading
'cold' when it was, in fact, boiling over and melting down! Asked Dax to send me another.
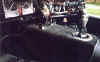
 Glued on the backrest carpet and all the footwell carpets. The thickness
of the chassis side is now filled with nice pink and blue foam. Fitted the gearlever
gaiter, trim ring and knob.
Glued on the backrest carpet and all the footwell carpets. The thickness
of the chassis side is now filled with nice pink and blue foam. Fitted the gearlever
gaiter, trim ring and knob.
 Bolted the dashboard in and made an ali bracket to hold its the rear edge
of the centre console immobile. The dash bolts are such a bugger to get in that Sod's Law
dictates that they'll have to come out again soon for something unforeseen.
Bolted the dashboard in and made an ali bracket to hold its the rear edge
of the centre console immobile. The dash bolts are such a bugger to get in that Sod's Law
dictates that they'll have to come out again soon for something unforeseen.
Did a test run up the road and promptly ran out of fuel not many
yards from home. I was about to push it back when a gang of local kids came round the
corner on their bikes. "Cor Mister, how fast does it go?" quoth the lead urchin.
"Give me a push home and I'll tell you" spake embarrassed owner. Still, with
half-a-dozen of Cambridge's finest all pushing fit to bust a gut, we got home in record
time. It seemed churlish to complain that they started pushing so soon that the Dax ran
over my foot. Thank goodness it's a light car and didn't hurt (much). Said urchins had to
have a sit in the Dax (and the MR2) as a reward and then thankfully vanished to terrorise
some innocent wildlife somewhere, no doubt.
Had another go at the fuel sender. Shortened and bent its
operating arm so that it should read 'empty' with (freshly fetched) 5 litres of fuel in
and 'full' when full. Cut a full-size hole in the bonnet for the air filter and trimmed
its edge with some black plastic push-on edging stuff. Fitted the air filter and connected
its breather hose to the right-hand rocker cover. Friend Chris arrived and helped measure
then set the front tracking and camber. Chris fitted the steering column cowl, which
resisted by cunningly fouling on the (now trimmed) dashboard. Some bolts, superglue and
swearing will be required to make it fit.
There was a small coolant leak from under the thermostat housing.
We removed this and cleaned and re-made the all the joints. All seemed well, even when the
engine ran and pressurised the system. Later however, the abominable leak was back. It
seems to be coming from the top hose / thermostat housing joint. I've tightened the
jubilee clip as far as it will go, but still: drip, drip, drip ...
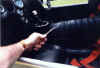
The speedo arrived back from Speedy Cables and was inserted into
the dashboard. It sits at a funny angle 'cos I can't easily get to its rear to tighten the
securing clips.
19-28/7/99
It's the thermostat housing that's leaking :-( The modified weld
done by Dax has a pin-hole in it! I removed it and sent it back to Dax for re-welding.
Received a new water temperature sender from Dax, which has
exactly the same resistance in boiling water as the previous one. Maybe the gauge is
faulty?
 Torqued up all the front suspension bolts now that the weight is on the
wheels and the front alignment has been done. Mr. A. Grinder helped me carve the front
wing support brackets until they cleared the bottom balljoint nuts more easily. Spray
painted those parts of the brackets with satin black paint and fitted them.I gently bent
the brackets' arms to just clear the inner sidewall of the tyres and sit as close to the
tread as possible - about 1 inch. The front wings were stuck onto the brackets, using lots
of BD and overnight clamps. Once dry, lots more BD was gunged liberally over and around
the brackets under the wings, followed by a thick coat of paint-on underseal. Well, when I
say 'underseal' I actually mean 'felt roof repair paint'. It's black, rubbery, waterproof
and a hell of a lot cheaper than automotive underseal! This should stop small stones
thrown up by the tyres from star-crazing the gel-coat of the wings. The square edges of
the front wings had edge-piping clipped on to render them SVA-friendly.
Torqued up all the front suspension bolts now that the weight is on the
wheels and the front alignment has been done. Mr. A. Grinder helped me carve the front
wing support brackets until they cleared the bottom balljoint nuts more easily. Spray
painted those parts of the brackets with satin black paint and fitted them.I gently bent
the brackets' arms to just clear the inner sidewall of the tyres and sit as close to the
tread as possible - about 1 inch. The front wings were stuck onto the brackets, using lots
of BD and overnight clamps. Once dry, lots more BD was gunged liberally over and around
the brackets under the wings, followed by a thick coat of paint-on underseal. Well, when I
say 'underseal' I actually mean 'felt roof repair paint'. It's black, rubbery, waterproof
and a hell of a lot cheaper than automotive underseal! This should stop small stones
thrown up by the tyres from star-crazing the gel-coat of the wings. The square edges of
the front wings had edge-piping clipped on to render them SVA-friendly.
Trimmed and fitted the stainless steel kick-plates to the cockpit
sides. The rear join with the side-panel and rear tub was made neater with a strip of
edging trim stretched over the joint. Glued on the right-hand shoulder panel carpet.
I measured the rear wheel camber and toe, using a combination of
spirit level, string-lines and trigonometry (oh, and hope). The rear wheels were toed-out,
positive camber and pointing to the right a tad. With Wayne's help, I removed all four
rear wishbones and added / subtracted shims from the inner joints, according to the build
manual instructions, to set the wheels bolt upright, with zero toe and parallel with the
front wheels. Now that the rear wheels are in the right place, the rear wings can go on
and will be concentric.
Received the re-welded thermostat housing from Dax, together with
another water temperature sender (#3), which reads the same as the first two did.
It's not the sender then ...
Glued edge-trim to the rear wings' inside edges and 'undersealed'
them, ready to be fitted. I found out with the front wings that it's quite hard to paint
the underside whilst they're in position without getting thick black gloop in your hair.
29-31/7/99
Fitted the re-welded thermostat housing and water temperature
sender #2 and refilled the cooling system with antifreeze and water. Removed the oil
pressure relief valve and spring and fitted a new high-pressure spring. Luckily, only a
few spoonsful of oil came out whilst I was doing this.
Trial fitted the rear wings, using clamps to hold them in
position. It's immediately apparent that I can't get the gaps between wing and tyre even
all round. The gap at the front is much smaller than the gap at the back. Glued on the
final piece of carpet (left-hand shoulder panel) to cheer myself up.
I ran the engine again, until hot. Still no reading on the
temperature gauge. The oil pressure seems healthier than it was though, at 20 PSI idling
and up to 50 PSI when revved to 3000 rpm. Set the dynamic timing to 6 degrees BTDC using
my Xenon strobe gun. Measured the CO emissions using a borrowed exhaust gas analyser. 1.6%
CO seems very low (the SVA limit is 3.5% for a 1986 engine). Can this be right? I'll do it
again before SVA to be sure.
Two weeks to SVA!
Go on to August's progress.