
|
|
|
Home |
1-4/6/99
|
| Carpet set | |
| Seat belt 4-point harnesses | |
| Harness gaiters | |
| More wing piping (I'll run out otherwise) | |
| More edge trim (ditto) | |
| More self-tap bolts (already run out) | |
| Exchange kick-plates (originals 1.5" too short) | |
| Spire nuts to allow the gearlever trim ring to be bolted down | |
| Bag full of badges (wheels, front, back, steering wheel, gear knob) and a key fob |
They couldn't find a water temperature sender, compatible with my gauge, which fits into the manifold. They say they'll chase one up for me. My wheels still aren't ready either. To save time, I asked them to be delivered from Image Wheels straight to my workplace, instead of via Dax. These are the last undelivered bits.
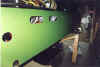
 With more self-tappers in hand, Friend Rob fastened the lower edges of the
side panels to the floor. We laid the carpets in place, just to see the effect. It'll look
great! We connected the heater box, via an in-line valve, to the engine. The exhaust
systems were bolted back on with lots of exhaust putty 'toothpaste' to seal the joints.
The cooling / heating system was now complete, so we filled the engine with antifreeze and
water in order to run it. Hmmm ... what's this blue stuff dripping on the floor?
Antifreeze! One hose connection to the T-piece was dripping. Dodgy hose connection made
inside the confines of the chassis without the aid of rose-jointed elbows. We did what I
should have done originally and took the whole bottom hose out, re-made the joint properly
on the bench and re-installed it. No leaks second time and the engine still runs :-) We
let it get quite hot to prove that the water is circulating properly. It's a bit quieter
with the exhaust joints made and an insulating water jacket. Still sounds fantastic though
:-)
With more self-tappers in hand, Friend Rob fastened the lower edges of the
side panels to the floor. We laid the carpets in place, just to see the effect. It'll look
great! We connected the heater box, via an in-line valve, to the engine. The exhaust
systems were bolted back on with lots of exhaust putty 'toothpaste' to seal the joints.
The cooling / heating system was now complete, so we filled the engine with antifreeze and
water in order to run it. Hmmm ... what's this blue stuff dripping on the floor?
Antifreeze! One hose connection to the T-piece was dripping. Dodgy hose connection made
inside the confines of the chassis without the aid of rose-jointed elbows. We did what I
should have done originally and took the whole bottom hose out, re-made the joint properly
on the bench and re-installed it. No leaks second time and the engine still runs :-) We
let it get quite hot to prove that the water is circulating properly. It's a bit quieter
with the exhaust joints made and an insulating water jacket. Still sounds fantastic though
:-)
I powered up the heater fans and felt a reassuring waft of hot air come out of the scuttle vents. Not quite a tornado of power, but as good as my MG's heater ever was. It should do the job of clearing a windscreen the size of a postage stamp OK.
Carved a bit out of the dashboard moulding where it fouled the ignition key. After some careful marking and filing, I replaced the missing bit with a 'scalloped' bit of ali to make a nice indented section where your knuckles must go. When trimmed, it should look like it was meant to be there all along!
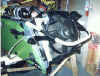
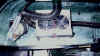
Using my cardboard instrument simulators as a guide, I cut the five round holes in the dash for the instruments.
![]() Cut the remaining holes in the dash, allowing a little clearance round the
instruments and switches for the thickness of the vinyl covering.
Cut the remaining holes in the dash, allowing a little clearance round the
instruments and switches for the thickness of the vinyl covering.
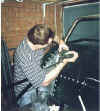
Fastened the battery negative cable inside the scuttle. I passed all the pipes and wires through the main grommet in the scuttle front. It was a bit tight, but they all go through.
Visited the Newark Kitcar show, where I met three other Rush owners, one with a V8 very much like mine! Picked up some nice indicator lights on stalks. I'll put them in my bottom drawer 'just in case they come in useful in the future' ;-)
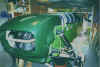
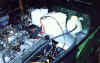
![]() Stuck
foam and vinyl sheet onto the dash front. Cut the vinyl in the holes , pulled it through
to the back and glued it there. Put the instruments in place - it looks very good :-)
Draped the under-scuttle part of the loom in place, to see where it could be fastened.
Fitted the plastic plug connectors to the terminals on the wire ends and plugged all three
parts of the loom together. Connected the wipers, washers, heater, stalks and ignition
key. Found that the Sierra key switch disconnects all ignition circuits when cranking the
engine, so I had to run an extra wire from the starter solenoid to the coil to feed it 12V
when starting the engine. This took a bit of squeezing in as the side-panel is now on and
prevents easy access to the wire runs.
Stuck
foam and vinyl sheet onto the dash front. Cut the vinyl in the holes , pulled it through
to the back and glued it there. Put the instruments in place - it looks very good :-)
Draped the under-scuttle part of the loom in place, to see where it could be fastened.
Fitted the plastic plug connectors to the terminals on the wire ends and plugged all three
parts of the loom together. Connected the wipers, washers, heater, stalks and ignition
key. Found that the Sierra key switch disconnects all ignition circuits when cranking the
engine, so I had to run an extra wire from the starter solenoid to the coil to feed it 12V
when starting the engine. This took a bit of squeezing in as the side-panel is now on and
prevents easy access to the wire runs.
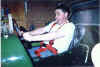
Fitted the fusebox through the front of the scuttle, for easy access. Glued (with BD) the block of relays inside the scuttle. Siliconed in the heater pipes. Trial fitted the completed dash and plugged in the switches and instruments. For the first time, I sat in the seat, turned the key and the engine started without having to hold bits of wire on the battery! All the electrics, except the lights (which aren't fitted yet), checked out OK.
1 month to SVA!
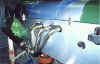 Bolted the nose cone to the chassis top rails, just to hold it firm while
I fitted the bonnet. I intend to hinge the nose later. Trimmed the front & back edge
of the bonnet with tin-snips (carefully!) until it fitted nicely. Attached its four clips.
Bolted the nose cone to the chassis top rails, just to hold it firm while
I fitted the bonnet. I intend to hinge the nose later. Trimmed the front & back edge
of the bonnet with tin-snips (carefully!) until it fitted nicely. Attached its four clips.
Trial fitted the windscreen and the wipers. Tested the washer system - OK! I plugged the jets for 5 seconds (as the SVA test will do) and nothing leaked or failed :-) Tested the wipers - OK, although the sweep isn't as good as it could be. The wipers go only just past vertical. Maybe I'll get a new gear for the wiper motor with a wider angle of sweep. Fitted the front lower right-hand wishbone and damper. The front bolt is a right bitch to get in, as it's inside the side panel, behind a chassis rail, under the steering column, next to the oil pipes. I fiddled it in, but don't know yet how I'm going to torque it up properly when it's on its wheels ...
Still no wheels, although both Dax and Image (the wheel makers) promise them "this week". Unconvinced, I still thought I'd get ready for them and started fitting the suspension. Rear suspension and brakes went on first.
With the rear driveshafts held in their hubs instead of drooping inside the chassis, I could start and run the engine with the gearbox in gear (still no clutch fluid, remember) and watch the shafts turn! Since the speedo was now registering something, I could check the speedo against the tacho readings and, knowing the 'box and diff ratios, calculate whether the speedo was reading right. Unfortunately, my figures put it at 11% high, where the SVA limit is 10% high. I'll have to get it calibrated after all.
I rebuilt the wiper motor with a new gear wheel, which gives a 125 degree sweep, instead of only 110 degrees. It's much better now.
Friend John started fitting the reversing lamp and fog lamp to the rear body tub.
Fitted the rest of the front right-hand suspension and the left-hand caliper. With the braking system now sealed, I could fill the reservoir with fluid and start the process of bleeding the clutch and brakes. A few joints wept (or pissed) brake fluid until I nipped them up a turn. Bleeding will take a few sessions to get the air worked out of the system, but by the end of the first session I had a brake pedal that would stop a freely-spinning front hub and a clutch pedal that sometimes didn't go all the way to the floor :-)
Time now is getting very tight before the SVA. Less than 3 weeks to go!
Go on to July's progress.