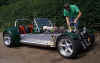
 4-7/9/99
There was no thermostat in the cooling system since I put it
together, on the advice of another V8 Rush owner. Now, the engine seems to be running a
little cool and Autumn is approaching. Gary at Dax advised a minimum running temp of 90
degC so I put the thermostat back in.
 Cold
starting was a bit tricky, with the engine having to be 'nursed' for a few minutes until
it would tick over on its own. To improve this, I fitted a choke control. This was a
one-size-fits-all universal locking choke cable from a local shop, held by a vinyl-trimmed
ali bracket which fits neatly under the dashboard above the driver's left knee. Starting
is now much easier, with the V8 settling down to a fast idle straight from cold. All I
have to do is to remember to push it in when warm! A choke return spring will help the
'feel' of the control knob at some point. The idle is still a bit lumpy though.
Cold
starting was a bit tricky, with the engine having to be 'nursed' for a few minutes until
it would tick over on its own. To improve this, I fitted a choke control. This was a
one-size-fits-all universal locking choke cable from a local shop, held by a vinyl-trimmed
ali bracket which fits neatly under the dashboard above the driver's left knee. Starting
is now much easier, with the V8 settling down to a fast idle straight from cold. All I
have to do is to remember to push it in when warm! A choke return spring will help the
'feel' of the control knob at some point. The idle is still a bit lumpy though.
 I took the Dax to RPi in Norwich to be
tuned. Several things were immediately apparent, including the fact that I'd plugged the
distributor vacuum advance pipe into the wrong outlet on the carburettor! The dizzy was
getting maximum vacuum at all times, not in proportion to the throttle setting. No wonder
the idle was a bit lumpy - the advance was waaaay too much. RPi modified the internal
advance of the dizzy and ground a helical groove into its driveshaft to stop oil creeping
up and out of the sealing ring. It wasn't leaking through the ring, but it's a sensible
precaution whilst it's in bits on the bench. They also ported the exhaust downpipe flanges
to match the cylinder head ports and replaced the somewhat worn rockers and rocker shafts.
I took the Dax to RPi in Norwich to be
tuned. Several things were immediately apparent, including the fact that I'd plugged the
distributor vacuum advance pipe into the wrong outlet on the carburettor! The dizzy was
getting maximum vacuum at all times, not in proportion to the throttle setting. No wonder
the idle was a bit lumpy - the advance was waaaay too much. RPi modified the internal
advance of the dizzy and ground a helical groove into its driveshaft to stop oil creeping
up and out of the sealing ring. It wasn't leaking through the ring, but it's a sensible
precaution whilst it's in bits on the bench. They also ported the exhaust downpipe flanges
to match the cylinder head ports and replaced the somewhat worn rockers and rocker shafts.
 RPi have an enlightened system whereby the customer can do most of his own
spanner-work, using RPi workshop space and tools if necessary. They charge a nominal £10
per hour for this, plus work they do themselves on the bits once I removed them.
RPi have an enlightened system whereby the customer can do most of his own
spanner-work, using RPi workshop space and tools if necessary. They charge a nominal £10
per hour for this, plus work they do themselves on the bits once I removed them.
 I spent six hours at RPi and it cost a lot less than if I'd just given
them the car to work on themselves. At the end of the component modification, they did a
full tune of the carb settings and ignition. The proprietor, Chris Crane, took the Dax for
a spin down the road before and after, and made sure the settings were correct for this
car.
I spent six hours at RPi and it cost a lot less than if I'd just given
them the car to work on themselves. At the end of the component modification, they did a
full tune of the carb settings and ignition. The proprietor, Chris Crane, took the Dax for
a spin down the road before and after, and made sure the settings were correct for this
car.
 The results were what I was after. The engine now idles as smooth as silk
and pick-up on acceleration is instantaneous. Peak power is unchanged, as the vacuum
advance was correct for wide-open throttle work, but the whole thing seems much less
harsh. Burbling around town is now a pleasure. Fifth is good for any speed over 20mph and
at those slow speeds, the sound is glorious!
The results were what I was after. The engine now idles as smooth as silk
and pick-up on acceleration is instantaneous. Peak power is unchanged, as the vacuum
advance was correct for wide-open throttle work, but the whole thing seems much less
harsh. Burbling around town is now a pleasure. Fifth is good for any speed over 20mph and
at those slow speeds, the sound is glorious!
11-16/9/99
My tonneau covers were ready for collection. I called in at Dax
on my way to a weekend visiting friends. At Dax, I asked Gary if he would like a drive in
my Dax, to give me his impressions and suggest and suspension adjustments. He took me on
their usual customer demonstration route, which has some fast dual-carriageway, some
roundabouts and some country lanes. He found a quiet roundabout and did two laps with the
back end hanging out to the accompaniment of shrieks from the tyres, a roar from the
engine and quiet panic from me! His verdict: a 'nice and tight' car. To get maximum grip
and handling, I need to soften the shock absorbers, all the way to full-soft at the back,
and halfway at the front.
The next day I fitted the rear (boot) tonneau. This has
press-stud caps already fastened to the fabric and needed the bases riveting to the boot
lip. This fitted fine. The front tonneau, however, wouldn't work. The cut-outs for the
roll-bar were too close together to the tune of 1.5 inches. Also, it's meant to velcro to
the rear tonneau, but I'd been given covers with two fluffy sides of the velcro! I really,
really wanted the car to be water-proof for the next weekend (the Donington show) so I
took the cover back to Dax on the Monday. Their trimmer made me a new cover and couriered
it to me for Thursday. It was fitted Thursday night and fits nicely now. Whew!
Since then, the covers have got wet a couple of times with no
signs of letting any damp through.
 23/10/99
I want to improve the front brakes for two reasons. One, the rear
wheels still lock first if provoked and two, the solid Cortina discs look a bit lost
behind the front wheels. Something a bit meatier is called. for and, with that in mind I
had picked up some second-hand Austin Princess 4-pot calipers, which are a bolt-on upgrade
to Ford front brakes. They will need Capri 2.8i vented discs. I got some Mintex 1144 pads
to suit.
I stripped the calipers down and, as I expected, they will need
new pistons and seals. There is a short piece of copper pipe linking the two halves of
each caliper. These pipes are a bit squashed and scruffy so I'll have a go at making some
replacements.
 6-20/11/99
I collected my mohair sidescreens from Dax a few weeks after
ordering them. They were fitted over the course of several evenings, finishing the day
before the Oxford Meet. The little bungy straps that
hold the screens inwards and downwards followed by post a week after collection and just
in time for their first outing.
 Fitting the screens was a little nerve-wracking as I had to drill and tap
the windscreen supports while holding the unbolted but not unglued windscreen far enough
out of the path of the drill, but not so far that it cracked!
Fitting the screens was a little nerve-wracking as I had to drill and tap
the windscreen supports while holding the unbolted but not unglued windscreen far enough
out of the path of the drill, but not so far that it cracked!
 The screens need some careful trial-fitting as there is nothing to set
their height or fore/aft positioning with any degree of premeditation. After a lot of
holding and measuring I got them in a reasonable position, as high as practical and level
with each other. Now the only problem is getting in and out gracefully with the damn
things on! Practice will make perfect, I hope.
The screens need some careful trial-fitting as there is nothing to set
their height or fore/aft positioning with any degree of premeditation. After a lot of
holding and measuring I got them in a reasonable position, as high as practical and level
with each other. Now the only problem is getting in and out gracefully with the damn
things on! Practice will make perfect, I hope.
Oxford proved that they work as advertised. Wind buffeting is
almost non-existent (except to the top of my hat). On some right-hand corners I have to
deliberately peer through the side window as the front of the sidescreen (what would be
the 'A' pillar on a normal car) is quite thick and gets in the way a bit. This is a small
price to pay though :-)
 20/4/00
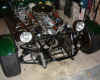
 The
air-filter housing that sticks through the bonnet was part of the engine package I got way
back in January 1999. It was a bit dented, a bit discoloured and a bit scruffy. I replaced
the top cover with a nice, flat, shiny chromed one from RPi.
The
air-filter housing that sticks through the bonnet was part of the engine package I got way
back in January 1999. It was a bit dented, a bit discoloured and a bit scruffy. I replaced
the top cover with a nice, flat, shiny chromed one from RPi.
 10-14/5/00
OK, time to bite the bullet and do all those dashboard-off jobs
that I had been postponing. So off came the steering wheel, cowling, stalks, then the
whole dashboard. It's a real fiddle to undo the nuts on the four captive bolts that fasten
the dash to the flange on the scuttle and involves much contorting of arms behind the
partially-disconnected dash. Finally the dash was loose and could be pulled forwards a
foot or so, just enough to carry out the planned operations without having to disconnect
the wiring loom or the oil pressure gauge tube.
First in was the new voltmeter and, yes, I had tested it first! I
found the position I wanted for the voltmeter on the face of the dash and made some cuts
in the vinyl in the right place. I stitch-drilled a ring of 3mm holes in the back of the
dash, joined them with a sharp knife, then filed out the hole to the requisite 52mm. The
flaps from the cut vinyl could then be pulled through the hole and glued to the back of
the dash. The voltmeter pushed through the hole and is secured with a large plastic nut.
It was simplicity itself to wire in. There was already provision for it in the loom, in
the form of two wires with spade connectors neatly coiled up and tie-wrapped into a small
plastic bag. The meter's illumination bulb was spliced into the wiring for the
neighbouring instrument, the fuel gauge.
Next was my new immobiliser. Not too many details on how this
works, for obvious reasons ;-) I found room for its control box behind the dash in a place
where it cannot easily be got at. It sports a nice flashing red LED which I positioned
between the main dials in the middle of the dash. It's very bright even in daylight and
will hopefully act as a bit of a warning.
Finally came the big, red master battery cut-off switch. I wanted
this accessible from the driver's seat yet not obvious to the casual glance. This is both
because big, red switches poking out of the dashboard or bodywork look ugly (IMHO) and
because it can act as a slightly covert security device. It also doesn't encourage the
curious or the larcenous to simply swipe the key and leave me up the proverbial without a
wossname.
A suitable place is behind the centre console in the passenger
footwell. I had already been careful to run the battery's main negative lead in a big loop
behind the dash before bolting it to the chassis. This meant there was enough cable to cut
it, fit big brass ring fasteners to the ends and bolt it to the back of the switch. I made
(yet another) aluminium bracket to hold the switch in place, far enough behind the console
to be unobtrusive and not a danger to a passenger's knees, but still accessible. The
bracket simply rivets to the GRP top of the tunnel.
Why the negative lead? Because there's only one of it. The
battery positive terminal sprouts 3 or 4 cables which would all have to be cut & shut
to be switched. Also there's a safety aspect. A misplaced bit of metal behind the dash
which touches the chassis and a switch terminal will, at worst, switch the car back on.
With a switched positive, that would result in sparks, sheets of flame and probably
Jadzia's obituary next on this page.
Reassembly, as the saying goes, was the reverse of dismantling.
 The
new voltmeter reads just over 12V with the ignition on and about 14V with the engine
running, so that's all as it should be. The immobiliser is easy to use - I'm still
training myself to use the new keyfob before trying to start the engine! The master switch
kills the whole car. This includes the immobiliser, but when the car is switched on again,
the immobiliser activates in the 'set' state and flashes its LED. I'm considering wiring a
very small value fuse across the master switch terminals. This would allow the LED to
flash but would instantly blow if someone tried to turn the engine over.
The
new voltmeter reads just over 12V with the ignition on and about 14V with the engine
running, so that's all as it should be. The immobiliser is easy to use - I'm still
training myself to use the new keyfob before trying to start the engine! The master switch
kills the whole car. This includes the immobiliser, but when the car is switched on again,
the immobiliser activates in the 'set' state and flashes its LED. I'm considering wiring a
very small value fuse across the master switch terminals. This would allow the LED to
flash but would instantly blow if someone tried to turn the engine over.
21-27/5/00
 Oh
deary, deary me.
Oh
deary, deary me.  Those ugly front bumper bars (there for SVA purposes) have just sort of
fallen off ;-) Actually, their disappearence was assisted by my brother Jim. Fortunately,
when they had gone, we noticed some nice chromed motorbike-style front indicator stalks
fixed to the front of the chassis, where they had obviously been completely overlooked.
Those ugly front bumper bars (there for SVA purposes) have just sort of
fallen off ;-) Actually, their disappearence was assisted by my brother Jim. Fortunately,
when they had gone, we noticed some nice chromed motorbike-style front indicator stalks
fixed to the front of the chassis, where they had obviously been completely overlooked.
 In
this position, the indicators don't have to be removed with the nosecone, simplifying the
wiring and the fixing. They appear to be bolted through the aluminium side-panel, just
behind the frontmost upright chassis tube. An ali spreader plate BD'd to the back of the
panel supports each stalk. The nosecone closes close to the stalk, providing a clean
appearence.
In
this position, the indicators don't have to be removed with the nosecone, simplifying the
wiring and the fixing. They appear to be bolted through the aluminium side-panel, just
behind the frontmost upright chassis tube. An ali spreader plate BD'd to the back of the
panel supports each stalk. The nosecone closes close to the stalk, providing a clean
appearence.
 Since
the SVA bars weren't there to stop the nosecone hingeing forwards any more, I fixed hinge
bolts through the holes I drilled nearly a year ago to allow the nose to pivot forwards.
To stop it smashing the number plate into the cold, hard ground I fitted a check strap
from the top chassis rail behind the radiator to the flange at the back of the nosecone.
The check strap is actually a Mini boot strap. Access to the radiator and fan is still
quite adequate for maintenance but now the nose is held on much more securely than before.
Since
the SVA bars weren't there to stop the nosecone hingeing forwards any more, I fixed hinge
bolts through the holes I drilled nearly a year ago to allow the nose to pivot forwards.
To stop it smashing the number plate into the cold, hard ground I fitted a check strap
from the top chassis rail behind the radiator to the flange at the back of the nosecone.
The check strap is actually a Mini boot strap. Access to the radiator and fan is still
quite adequate for maintenance but now the nose is held on much more securely than before.
 7-8/7/00
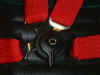
 I had
a run down to Dax and picked up the new seat belts that I'd ordered a few weeks ago. These
are the same as before, red Willans 4-point harnesses, but with the 'aircraft' style
buckles which will hopefully mean less struggling to get into and out of the belts.
I had
a run down to Dax and picked up the new seat belts that I'd ordered a few weeks ago. These
are the same as before, red Willans 4-point harnesses, but with the 'aircraft' style
buckles which will hopefully mean less struggling to get into and out of the belts.
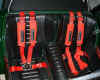 Fitting
them was simplicity itself - each of the 8 loose ends simply snaps onto the existing
eyebolt. The old belts went to a good home, to adorn William's Tiger.
Fitting
them was simplicity itself - each of the 8 loose ends simply snaps onto the existing
eyebolt. The old belts went to a good home, to adorn William's Tiger.
 Due to
the good ol' British weather, I've only had the chance to try them out a couple of times
but they are certainly easier to get into and out of.
Due to
the good ol' British weather, I've only had the chance to try them out a couple of times
but they are certainly easier to get into and out of.
 14-16/8/00
 Several
times now I've had oil surge when cornering or braking hard. It's worrying to see the
yellow oil light come on and the pressure gauge drop to zero for a few seconds, so I
bought a nice new baffled sump from Dave Ellis at DJE.
It's based on a Range Rover sump, which should give me a smidge more ground clearance,
with internal gutters, baffles and trap-doors to stop the oil surging forwards under
braking or sideways under cornering. I need to get Dave's recommended Valvoline Racing
20W50 oil then I can fit it. I'll compare the heights of the two sumps when the old one is
off.
Several
times now I've had oil surge when cornering or braking hard. It's worrying to see the
yellow oil light come on and the pressure gauge drop to zero for a few seconds, so I
bought a nice new baffled sump from Dave Ellis at DJE.
It's based on a Range Rover sump, which should give me a smidge more ground clearance,
with internal gutters, baffles and trap-doors to stop the oil surging forwards under
braking or sideways under cornering. I need to get Dave's recommended Valvoline Racing
20W50 oil then I can fit it. I'll compare the heights of the two sumps when the old one is
off.
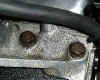
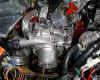
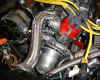
 While at DJE, I bought some stainless steel bolts to pretty up some of the
original engine fittings such as the inlet manifold bolts ...
While at DJE, I bought some stainless steel bolts to pretty up some of the
original engine fittings such as the inlet manifold bolts ...
 ... and the rocker cover bolts.
 Those
who have been paying close attention to these ramblings will remember that I've harped on
in the past about wanting better front brakes. This is because the rear wheels, if
provoked, still lock up first which is No Good. Having decided not to use the grotty and
heavy Princess 4-pot calipers which I got (any offers?), the cheapest first option is to
try some better front brake pads. With this in mind, I ordered some kevlar EBC Greenstuff
pads from Sejoc. They are now fitted, but hardly
bedded in yet so it's too early to tell if they are the panacea I need. But watch this
space ...
Those
who have been paying close attention to these ramblings will remember that I've harped on
in the past about wanting better front brakes. This is because the rear wheels, if
provoked, still lock up first which is No Good. Having decided not to use the grotty and
heavy Princess 4-pot calipers which I got (any offers?), the cheapest first option is to
try some better front brake pads. With this in mind, I ordered some kevlar EBC Greenstuff
pads from Sejoc. They are now fitted, but hardly
bedded in yet so it's too early to tell if they are the panacea I need. But watch this
space ...
20/8/00
 Today
I raised the Dax up on four axle stands, drained the oil and removed the old sump. This
was the first time I'd had a good look at over 4000 miles of wear and tear, especially the
massive scrapes and dents caused by my 'low flying' episode.
Today
I raised the Dax up on four axle stands, drained the oil and removed the old sump. This
was the first time I'd had a good look at over 4000 miles of wear and tear, especially the
massive scrapes and dents caused by my 'low flying' episode.
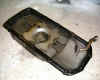
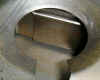
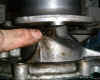
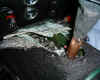
 The
old pickup pipe, strainer and windage tray have to be removed and discarded, revealing the
inside of the crankcase.
The
old pickup pipe, strainer and windage tray have to be removed and discarded, revealing the
inside of the crankcase.
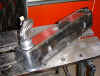
 With
the old and new sumps side-by-side, you can clearly see that the SD1 sump (left) is about
1/4" deeper than the Range Rover sump (right). From the side, the RR sump extends
much further forwards to increase its capacity and has a slight 'lead-in' to the well.. It
also doesn't have the daft plate linking it to the bellhousing (which makes it really
awkward to get at the rear sump bolts) and the drain plug is, for some reason, on the
other side.
With
the old and new sumps side-by-side, you can clearly see that the SD1 sump (left) is about
1/4" deeper than the Range Rover sump (right). From the side, the RR sump extends
much further forwards to increase its capacity and has a slight 'lead-in' to the well.. It
also doesn't have the daft plate linking it to the bellhousing (which makes it really
awkward to get at the rear sump bolts) and the drain plug is, for some reason, on the
other side.
22-24/8/00
 The new
sump received a few coats of the same red engine paint that the block already has. After
18 months in the tin, the paint still had some life left in it, once the skin was scooped
out and some thinner mixed in.
The new
sump received a few coats of the same red engine paint that the block already has. After
18 months in the tin, the paint still had some life left in it, once the skin was scooped
out and some thinner mixed in.
 I
refitted the pick-up pipe and sump with their new gaskets. On the theory that the dipstick
level is still going to be marked correctly for the Range Rover sump, I filled the engine
with Valvoline 20W50 Racing oil as recommended by DJE. A new Champion oil filter finished
the installation.
I
refitted the pick-up pipe and sump with their new gaskets. On the theory that the dipstick
level is still going to be marked correctly for the Range Rover sump, I filled the engine
with Valvoline 20W50 Racing oil as recommended by DJE. A new Champion oil filter finished
the installation.
One brief thrash later, no oil surge occurred (not that it was
common before, by any means) and no leaks either.
26/5/01
 No entries for a while, due to just enjoying the driving. Oh, and trivial
things like changing jobs, cities and houses! I'm pleased to report that I've seen no more
oil surge - the sump works! Although it gets scraped a bit when entering or leaving my new
driveway. A sump guard is in order - watch this space.
No entries for a while, due to just enjoying the driving. Oh, and trivial
things like changing jobs, cities and houses! I'm pleased to report that I've seen no more
oil surge - the sump works! Although it gets scraped a bit when entering or leaving my new
driveway. A sump guard is in order - watch this space.
I'd fancied one of those Malpassi fuel filter / regulators for a
while, as I suspected that the original filter pre-carburettor filter wasa bit small
and restrictive. The instructions for my Weber carb give a maximum working pressure of 5.5
PSI and I wondered whether the Carter fuel pump was over-pressuring it, leading to fuel
surge under heavy braking which may have been the cause of the engine stumbling if I hit
the middle pedal hard with the clutch pushed.
 I removed
the old filter by drilling out the pop-rivets of the P-clips holding the pipes. The
existing feed pipe was cropped back by a foot or so, which meant lying under the car in a
growing puddle of petrol which dripped from the severed end of the pipe, hoping that no
fag-smoking friends dropped in unexpectedly! Using a pipe coupler, I attached the new
braided hose to the existing pipe. I made a support bracket for the filter from its
galvanised steel mounting plate (supplied with the filter), bent and bolted to a section
of L-angle aluminium with stainless cap-headed bolts.
I removed
the old filter by drilling out the pop-rivets of the P-clips holding the pipes. The
existing feed pipe was cropped back by a foot or so, which meant lying under the car in a
growing puddle of petrol which dripped from the severed end of the pipe, hoping that no
fag-smoking friends dropped in unexpectedly! Using a pipe coupler, I attached the new
braided hose to the existing pipe. I made a support bracket for the filter from its
galvanised steel mounting plate (supplied with the filter), bent and bolted to a section
of L-angle aluminium with stainless cap-headed bolts.
 The bracket
has to sit at an angle on the battery tray to get the inlet and outlet hoses aligned
properly, but the installation is quite neat.
The bracket
has to sit at an angle on the battery tray to get the inlet and outlet hoses aligned
properly, but the installation is quite neat.
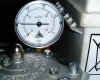 After making a
final check for leaks, I fired the pump up and saw a measly 1 PSI on the gauge. This was
due to the regulator being pre-set at this value. Luckily I had the pressure gauge so I
was able to adjust the regulator. Unluckily, the pressure maxed out at 3 PSI, well within
the carb's range so my pet theory about fuel surge looks to be wrong. On the bright side,
the pressure doesn't drop even at wide open throttle (WOT) so the pump is definitely up to
the job.
After making a
final check for leaks, I fired the pump up and saw a measly 1 PSI on the gauge. This was
due to the regulator being pre-set at this value. Luckily I had the pressure gauge so I
was able to adjust the regulator. Unluckily, the pressure maxed out at 3 PSI, well within
the carb's range so my pet theory about fuel surge looks to be wrong. On the bright side,
the pressure doesn't drop even at wide open throttle (WOT) so the pump is definitely up to
the job.
Since the Malpassi has been on I've still noticed the stumbling
under heavy braking. Next theory ...
6/3/02
Well, another few months pass with no entries. How come? It's
been a mixture of simply driving the Dax and leaving it in the garage when the weather was
here. Since New Year 2002 I've been having a bit of a tidy-up of a few bits 'n pieces. I
started a To-Do list which stretched to 2 sides of A4! Not all of these things will get
done (some are upgrades rather than tidying) but there's plenty to keep me occupied.
 Chiefly I wanted to fix the bits of rust that were starting to appear
where road grit had blasted off the powder-coating. A few pretty-up tasks are on the list,
mainly braiding of the various pipes and wires, just for show. There were also a couple of
repairs, such as fixing a minor leak from the water pump and a couple of upgrades, like
changing a brake master cylinder to improve the front brake bias.
Chiefly I wanted to fix the bits of rust that were starting to appear
where road grit had blasted off the powder-coating. A few pretty-up tasks are on the list,
mainly braiding of the various pipes and wires, just for show. There were also a couple of
repairs, such as fixing a minor leak from the water pump and a couple of upgrades, like
changing a brake master cylinder to improve the front brake bias.
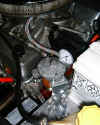
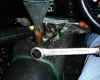
 I put the Dax up on four axle stands. First job - remove most of the
cooling system. This is to:
I put the Dax up on four axle stands. First job - remove most of the
cooling system. This is to:
 These tasks have now been done and look 100% better. The old water pump
was definitely showing signs of a leak from its small overflow hole under the pulley.
These tasks have now been done and look 100% better. The old water pump
was definitely showing signs of a leak from its small overflow hole under the pulley.
 I used some black plastic braiding that I picked up in Los
Angeles to cover most of the visible wiring. When fitted with heat-shrink tubing to cover
the ends it looks much neater!
I used some black plastic braiding that I picked up in Los
Angeles to cover most of the visible wiring. When fitted with heat-shrink tubing to cover
the ends it looks much neater!
 A while ago I got a brake master cylinder from Ash Trowe. This was to
replace the front brake cylinder with a slightly smaller one in the search for an improved
brake balance - more towards the front. To get the old cylinder out I had to remove the
entire pedal box, which gave me the chance to clean and paint the clutch master cylinder
which was bare cast iron and going rusty on the surface.
A while ago I got a brake master cylinder from Ash Trowe. This was to
replace the front brake cylinder with a slightly smaller one in the search for an improved
brake balance - more towards the front. To get the old cylinder out I had to remove the
entire pedal box, which gave me the chance to clean and paint the clutch master cylinder
which was bare cast iron and going rusty on the surface.
 I carefully masked up the rear cylinder in situ, so that I didn't have to
break its integrity and re-bleed it, and sprayed it Plasticote silver. The other cylinders
and the pedal box frame were also sprayed and the alloy bits polished.
I carefully masked up the rear cylinder in situ, so that I didn't have to
break its integrity and re-bleed it, and sprayed it Plasticote silver. The other cylinders
and the pedal box frame were also sprayed and the alloy bits polished. 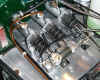 It's now reassembled and bled and to be tested when we're back on the
road.
It's now reassembled and bled and to be tested when we're back on the
road.
20/3/02
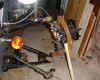
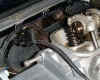
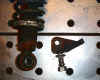 I've dismantled most of the front left
suspension and cleaned and painted the parts, some of which were going quite rusty due to
road grit and time. The SPAX shock absorber in particular was bad. I wire brushed and
painted everything.
I've dismantled most of the front left
suspension and cleaned and painted the parts, some of which were going quite rusty due to
road grit and time. The SPAX shock absorber in particular was bad. I wire brushed and
painted everything. 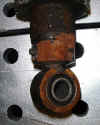 It's all better now!
Last year I noticed a slight drumming noise coming from the
gearlever. It had to be the gearbox entension rubbing on the front propshaft universal
joint, which was something that had to be fixed. The extension is held by four bolts
through nylon bushes. You can get to the lower pair from underneath, but the top two are
on top of the gearbox and hidden inside the tunnel. Rather than take the tunnel off (or
the engine & box out!) I decided to make an access hatch on top of the tunnel.
 This involved unfastening the dashboard and shoving it back out of the
way, removing the gearlever trim ring, making a cut in the carpet from the gearlever hole
forwards and peeling back the carpet from under where the centre console normally is.
This involved unfastening the dashboard and shoving it back out of the
way, removing the gearlever trim ring, making a cut in the carpet from the gearlever hole
forwards and peeling back the carpet from under where the centre console normally is.

 Now I could make two slots with a hacksaw blade in the tunnel top. Luckily
the resulting flap could be bent upwards enough to get at the relevant bolts without
having to remove it entirely. I'll glue the carpet back over the flap and use the
gearlever trim ring to hold it all solid again.
Now I could make two slots with a hacksaw blade in the tunnel top. Luckily
the resulting flap could be bent upwards enough to get at the relevant bolts without
having to remove it entirely. I'll glue the carpet back over the flap and use the
gearlever trim ring to hold it all solid again.
24/3/02
OK, the tunnel and dash are back together. Before I fixed the
dash in place I pulled the heater hoses off the useless screen vent slots and directed
them downwards, towards the occupants' feet. As the top two dash bolts are virtually
inaccessible up behind the instruments, I'm trying some inch-wide velcro to hold the dash
top in place. There are still bolts at the sides and on the centre console to stop it
coming loose.
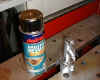
 I polished up the rocker covers and picked out the 'vanes' in red enamel
to match the engine block. The breather hose is now shorter than before as I've turned the
rockers round the other way. I covered this with some more stainless overbraiding and used
a naff ali fake nut to hide the jubilee clip. A bit "Max Power", but at least
they're not red or blue!
I polished up the rocker covers and picked out the 'vanes' in red enamel
to match the engine block. The breather hose is now shorter than before as I've turned the
rockers round the other way. I covered this with some more stainless overbraiding and used
a naff ali fake nut to hide the jubilee clip. A bit "Max Power", but at least
they're not red or blue!
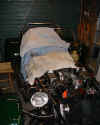
 The engine bay is now all but complete in its tart-up. I filled the
cooling system with antifreeze mix and watched glumly as it pissed out of the underneath
of the thermostat housing. My first thought was that the replacement socket head bolts
were a bit too long and were bottoming out in their holes before gripping the housing. I
removed them one at a time and angle-ground a few threads off. No improvement :-(
The engine bay is now all but complete in its tart-up. I filled the
cooling system with antifreeze mix and watched glumly as it pissed out of the underneath
of the thermostat housing. My first thought was that the replacement socket head bolts
were a bit too long and were bottoming out in their holes before gripping the housing. I
removed them one at a time and angle-ground a few threads off. No improvement :-( 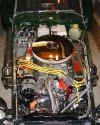 So I removed the whole housing (as far as the attached hoses would let me)
and found that the gasket had a very off-centre impression of the thremostat in it! The
'stat must have slipped down and been caught between the housing and the manifold. A new
gasket, a blob of superglue to hold the offending 'stat in place temporarily and it all
went back together and held water. Phew! I went for a test drive, the first this year. The
temperature was fine - more than fine in fact as it registered about 80 - 85°C. When we
hit some traffic though, it shot up to just over 100°. I nursed it home where it turned
out that the radiator fan wasn't running. I traced it to a dirty spade connector after
which it ran fine.
So I removed the whole housing (as far as the attached hoses would let me)
and found that the gasket had a very off-centre impression of the thremostat in it! The
'stat must have slipped down and been caught between the housing and the manifold. A new
gasket, a blob of superglue to hold the offending 'stat in place temporarily and it all
went back together and held water. Phew! I went for a test drive, the first this year. The
temperature was fine - more than fine in fact as it registered about 80 - 85°C. When we
hit some traffic though, it shot up to just over 100°. I nursed it home where it turned
out that the radiator fan wasn't running. I traced it to a dirty spade connector after
which it ran fine.
There are a few more things to do before the Open Day next Friday
(29th March), including giving it a damn good clean!
Fingers crossed for good weather ...
25/9/02
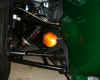 At
my brother's suggestion, I replaced the front indicator lenses (which were the
normal amber) with clear ones and amber bulbs. They are standard Mini parts,
although on a stalk like motorbike indicators. The result is a cleaner look at
the front.
At
my brother's suggestion, I replaced the front indicator lenses (which were the
normal amber) with clear ones and amber bulbs. They are standard Mini parts,
although on a stalk like motorbike indicators. The result is a cleaner look at
the front.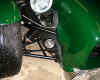
Another MOT came and went - Jadzia's third! On every
previous occasion, I'd had to make the reversing light work for the test, only
to have it fail again afterwards. The trouble is that the Rover gearbox
reversing switch is quite fragile and mine has a habit of 'wrapping' the
threaded brass body over the end of the steel plunger pin, eventually holding it
in. This made the reversing light stay on permanently, which could only be fixed
in the short term by taking the bulb out. I was getting fed up of doing keyhole
surgery through the gearlever hole to extract and repair the switch, so this
year I decided to do away with it altogether. After all, a reversing light is
not legally necessary in this type of vehicle and rearwards visibility is not a
problem with no window or pillars!
 I
obviously couldn't have a non-functioning reversing light on the rear panel (an
MOT failure for sure) so I changed it into another fog light. A bit of extended
wiring under the boot box and a new red lens cover saw a second fog light where
the reversing lamp had been.
I
obviously couldn't have a non-functioning reversing light on the rear panel (an
MOT failure for sure) so I changed it into another fog light. A bit of extended
wiring under the boot box and a new red lens cover saw a second fog light where
the reversing lamp had been.
30/11/03
It's been a long time since the last update. Many
apologies for that. Life has been hectic over the last 18 months and poor Jadzia
has sat unused in the garage for most of that time, In fact, between this year's
MOT test in August and last year's one, we covered a mere 1200 miles together.
This is partly the reason I've put her up for sale.
 However,
we are to be seen out and about in the Peak District when the sun shines and
routine maintenance carries on. I had noticed a few drips of coolant appearing
under the front after I had stopped and switched off. Only a teaspoonful came
out each time, and there was no noticeable drop in the header tank level, but I
wanted to seek out the source of the leak. After carefully checking all the
coolant hoses for splits and leaks, I concluded that it must be the radiator
itself, so out it came. With the rad out, I also had the opportunity to clean
some of the road muck from the front chassis tubes and inside the side-panels,
where it tends to accumulate. I could now easily access the oil filter without
having to drop it out the bottom of the car in the usual fashion, so I changed
the filter and oil (Valvoline 20/50 Racing semi-synthetic) while I was at it.
However,
we are to be seen out and about in the Peak District when the sun shines and
routine maintenance carries on. I had noticed a few drips of coolant appearing
under the front after I had stopped and switched off. Only a teaspoonful came
out each time, and there was no noticeable drop in the header tank level, but I
wanted to seek out the source of the leak. After carefully checking all the
coolant hoses for splits and leaks, I concluded that it must be the radiator
itself, so out it came. With the rad out, I also had the opportunity to clean
some of the road muck from the front chassis tubes and inside the side-panels,
where it tends to accumulate. I could now easily access the oil filter without
having to drop it out the bottom of the car in the usual fashion, so I changed
the filter and oil (Valvoline 20/50 Racing semi-synthetic) while I was at it.
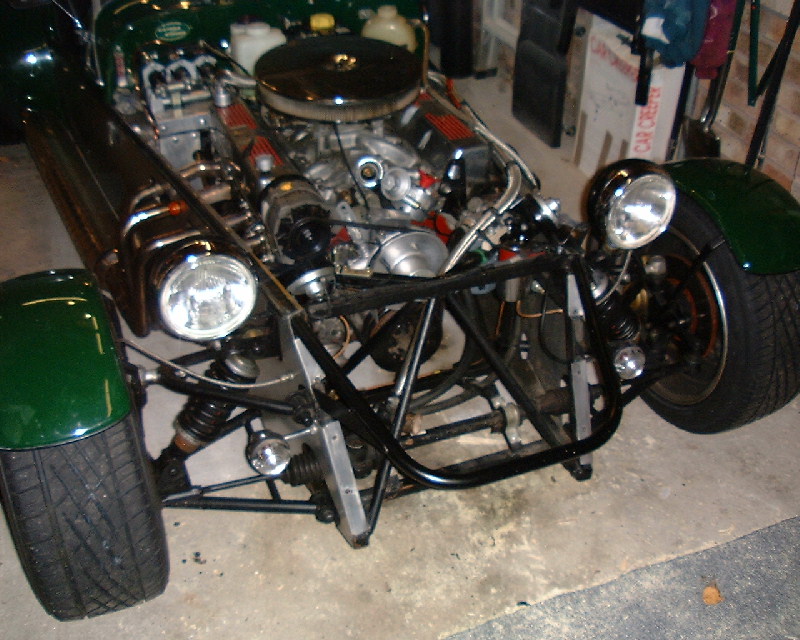
 With
the rad propped on the work bench and hoses attached to allow it to be partly
filled with water, I waited for the inevitable drips to appear, which they did.
With
the rad propped on the work bench and hoses attached to allow it to be partly
filled with water, I waited for the inevitable drips to appear, which they did.
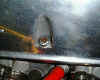
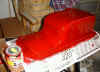
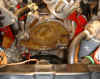
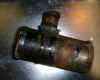
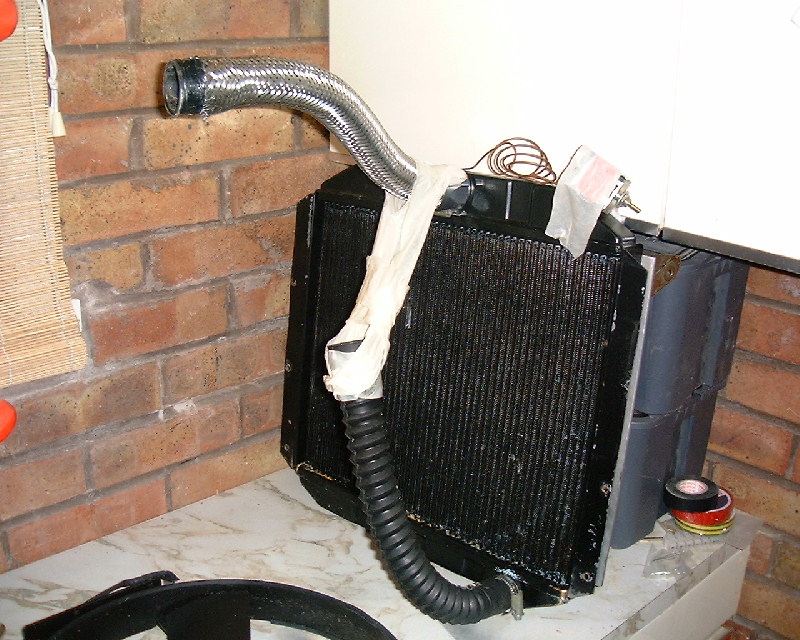
 It
turned out to be a soldered seam in the bottom tank of the radiator itself,
rather than a tube or joint as I'd been expecting. This made it quite easy to
repair, by heating the area with my trusty plumbing blowlamp and running in some
fresh solder and flux when it partially melted. This photo shows the cleaned,
repaired area. I'll spray the bare brass satin black to match the rest of the
rad.
It
turned out to be a soldered seam in the bottom tank of the radiator itself,
rather than a tube or joint as I'd been expecting. This made it quite easy to
repair, by heating the area with my trusty plumbing blowlamp and running in some
fresh solder and flux when it partially melted. This photo shows the cleaned,
repaired area. I'll spray the bare brass satin black to match the rest of the
rad.
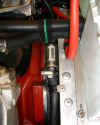
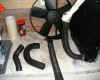 While
we have the cooling system in bits, it's the ideal time to sort out a couple of
little tube-related niggles. The bottom hose from rad to T-piece was a little
shorter than I'd have liked, which made it bend a bit too sharply. The hose
above it, from T-piece to water pump inlet was a cut-down Rover hose and was
wearing a bit thin in one spot where the fanbelt occasionally touched it as the
engine moved under extreme acceleration. It didn't leak, but it was only a
matter of time. I managed to source some nice new convoluted hoses from Halfords,
of the right bore and length, to replace the old hoses and allow a bit more
slack in the system to overcome these problems.
While
we have the cooling system in bits, it's the ideal time to sort out a couple of
little tube-related niggles. The bottom hose from rad to T-piece was a little
shorter than I'd have liked, which made it bend a bit too sharply. The hose
above it, from T-piece to water pump inlet was a cut-down Rover hose and was
wearing a bit thin in one spot where the fanbelt occasionally touched it as the
engine moved under extreme acceleration. It didn't leak, but it was only a
matter of time. I managed to source some nice new convoluted hoses from Halfords,
of the right bore and length, to replace the old hoses and allow a bit more
slack in the system to overcome these problems.
 Speaking
of the T-piece, it had given sterling service for four years, but looked a bit
grubby when its hoses were removed. Time for a grind back to bare metal and
repaint with Hammerite.
Speaking
of the T-piece, it had given sterling service for four years, but looked a bit
grubby when its hoses were removed. Time for a grind back to bare metal and
repaint with Hammerite.
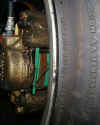
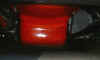
21/12/03
 T-piece
looking much better now.
T-piece
looking much better now.
6/4/04
To bring things right up to date, all the watery and
oily rebuild stuff is done with shiny new hoses in place. Jadzia is back on the
old black stuff and running again. Sunshine has been a bit rare over the last
few weeks, but we have managed to get out and about a couple of times, to blow
away a few cobwebs and create a V8 rumble in the Peak District valleys.
End of modification diary.


 However,
we are to be seen out and about in the Peak District when the sun shines and
routine maintenance carries on. I had noticed a few drips of coolant appearing
under the front after I had stopped and switched off. Only a teaspoonful came
out each time, and there was no noticeable drop in the header tank level, but I
wanted to seek out the source of the leak. After carefully checking all the
coolant hoses for splits and leaks, I concluded that it must be the radiator
itself, so out it came. With the rad out, I also had the opportunity to clean
some of the road muck from the front chassis tubes and inside the side-panels,
where it tends to accumulate. I could now easily access the oil filter without
having to drop it out the bottom of the car in the usual fashion, so I changed
the filter and oil (Valvoline 20/50 Racing semi-synthetic) while I was at it.
However,
we are to be seen out and about in the Peak District when the sun shines and
routine maintenance carries on. I had noticed a few drips of coolant appearing
under the front after I had stopped and switched off. Only a teaspoonful came
out each time, and there was no noticeable drop in the header tank level, but I
wanted to seek out the source of the leak. After carefully checking all the
coolant hoses for splits and leaks, I concluded that it must be the radiator
itself, so out it came. With the rad out, I also had the opportunity to clean
some of the road muck from the front chassis tubes and inside the side-panels,
where it tends to accumulate. I could now easily access the oil filter without
having to drop it out the bottom of the car in the usual fashion, so I changed
the filter and oil (Valvoline 20/50 Racing semi-synthetic) while I was at it.
 With
the rad propped on the work bench and hoses attached to allow it to be partly
filled with water, I waited for the inevitable drips to appear, which they did.
With
the rad propped on the work bench and hoses attached to allow it to be partly
filled with water, I waited for the inevitable drips to appear, which they did. It
turned out to be a soldered seam in the bottom tank of the radiator itself,
rather than a tube or joint as I'd been expecting. This made it quite easy to
repair, by heating the area with my trusty plumbing blowlamp and running in some
fresh solder and flux when it partially melted. This photo shows the cleaned,
repaired area. I'll spray the bare brass satin black to match the rest of the
rad.
It
turned out to be a soldered seam in the bottom tank of the radiator itself,
rather than a tube or joint as I'd been expecting. This made it quite easy to
repair, by heating the area with my trusty plumbing blowlamp and running in some
fresh solder and flux when it partially melted. This photo shows the cleaned,
repaired area. I'll spray the bare brass satin black to match the rest of the
rad.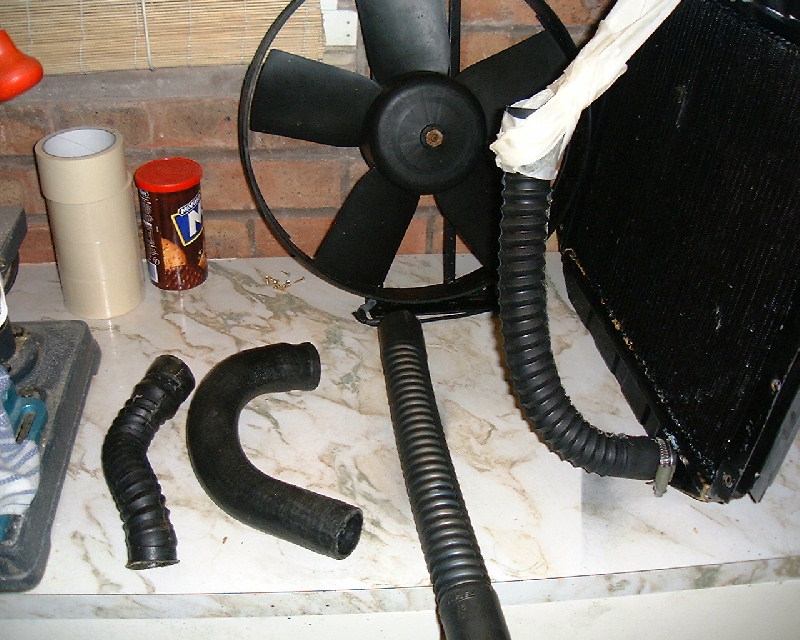 While
we have the cooling system in bits, it's the ideal time to sort out a couple of
little tube-related niggles. The bottom hose from rad to T-piece was a little
shorter than I'd have liked, which made it bend a bit too sharply. The hose
above it, from T-piece to water pump inlet was a cut-down Rover hose and was
wearing a bit thin in one spot where the fanbelt occasionally touched it as the
engine moved under extreme acceleration. It didn't leak, but it was only a
matter of time. I managed to source some nice new convoluted hoses from Halfords,
of the right bore and length, to replace the old hoses and allow a bit more
slack in the system to overcome these problems.
While
we have the cooling system in bits, it's the ideal time to sort out a couple of
little tube-related niggles. The bottom hose from rad to T-piece was a little
shorter than I'd have liked, which made it bend a bit too sharply. The hose
above it, from T-piece to water pump inlet was a cut-down Rover hose and was
wearing a bit thin in one spot where the fanbelt occasionally touched it as the
engine moved under extreme acceleration. It didn't leak, but it was only a
matter of time. I managed to source some nice new convoluted hoses from Halfords,
of the right bore and length, to replace the old hoses and allow a bit more
slack in the system to overcome these problems.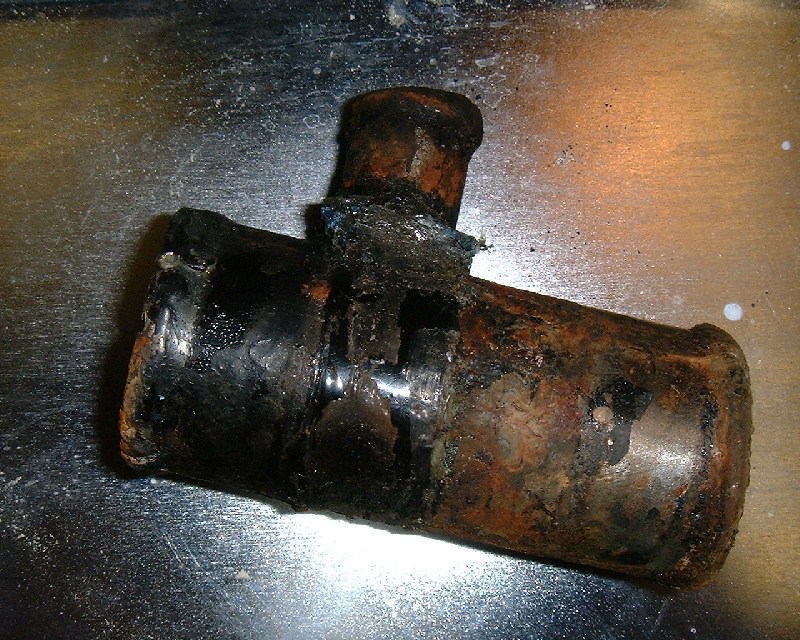 Speaking
of the T-piece, it had given sterling service for four years, but looked a bit
grubby when its hoses were removed. Time for a grind back to bare metal and
repaint with Hammerite.
Speaking
of the T-piece, it had given sterling service for four years, but looked a bit
grubby when its hoses were removed. Time for a grind back to bare metal and
repaint with Hammerite. T-piece
looking much better now.
T-piece
looking much better now.